Saturday, December 15, 2018

FWRISC: Creating a Unit-test Safety Net


When developing software, I've become very comfortable with test-driven development -- a methodology that calls for tests to be developed along with, or even before, functionality. It's quite common for me to develop a test first, which obviously fails initially, and implement functionality until the test passes.
I have typically approached hardware verification from a very different perspective. When doing verification, I've typically started with a hardware block that is largely functional, or at least is believed to be largely functional. My work then begins with test plan development and some detective work to ferret out the potentially-problematic areas of the design that require targeted tests.

When developing the FWRISC RISC-V core, I initially started off taking a verification approach. One of the requirements for the RISC-V contest was that cores must pass the RISC-V Compliance Tests. So, I started off by attempting to run one of the compliance tests. I quickly realized that there were some challenges with this approach:
  • Even for testing a simple feature, the RISC-V compliance tests are quite complicated. All involve exception instructions. All involve multiple instructions that are unrelated to the instruction that is ostensibly the target of the test. This isn't uncommon for verification, of course.
  • Taking a verification approach early in the development cycle means that debugging is incredibly painful. Tracking down a small issue with the core by looking at the test result of a test that consists of a hundred or so instructions is incredibly painful -- just see the waveform at the top of this blog post which comes from the test for the 'add' instruction.
  • In contrast, see the following waveform that shows the entire 'add' unit test. While it's longer than a single instruction, this test consists of a total of 6 instructions. This means that there's much less to look at when a problem needs to be debugged.


Creating a Testbench

My verification background is SystemVerilog and UVM, so one early complication I faced when developing tests for the Featherweight RISC core was that the RISC-V soft-core context explicitly required the use of Verilator as a simulator. Verilator is, in some senses, a simulator for the synthesizable subset of SystemVerilog. In other senses, it's a Verilog to C++ translator that can be used as to create a C++ version of a synthesizable Verilog description to bind in to a C++ program. Compared to a simulator, think of it, not as a house, but as a pile of lumber, tools, and a blueprint from which you can build a house (which, by the way, is in no way an attempt to minimize the value of Verilator -- just point out some of the required legwork). 

The fact that Verilator produces a C++ model of the SystemVerilog RTL brought to mind the unit-testing library that I invariably use when testing C++ code. Googletest is a very handy library for organizing and executing a suite of C++ unit tests:
      • Collects and categorizes tests
      • Enables common functionality to be centralized across tests
      • Provides result-checking macros/assertions
      • Executes an entire test suite, a subset, or a single test
      • Reports test status
In addition to using Googletest for standard C++ applications, I had used the Googletest framework to manage some early device firmware written in C when testing it against Verilog RTL being verified in a UVM testbench. This approach seemed close enough to what I was looking to do with Featherweight RISC and Verilator that I ended up extending that project (named googletest-hdl) to support Verilator. While the contest required the use of Verilator, I wanted to setup my basic test suite such that it could run with other simulators. Since the googletest-hdl project already supported running with SystemVerilog and UVM, I was covered there.

The Featherweight RISC testbench block diagram is shown below:


The design is instantiated in the HDL portion of the testbench. This testbench portion will run in Verilator or another Verilog simulator. The Googletest portion of the testbench contains the test suite and code needed to check test results. There are two points at which the environments communicate: the run-control path by which the Googletest environment instructs the HDL environment to run, and the tracer API path by which events are sent from the processor to the testbench environment.
The tracer API path is the key to checking test results. The following events are sent to the Googletest environment as SystemVerilog DPI calls:
  • Instruction-execution event
  • Register-write event
  • Data-access event
Now that we have this testbench structure, we can create some tests.

Creating Tests

When it comes to unit tests, I usually find that the initial test structure is successively refined as I discover more and more commonality between the tests. Frankly, the ideal unit test is almost-entirely data driven, and the Featherweight RISC tests are very close to this ideal.

The unique aspects of the instruction unit tests are stored in the test files themselves. Here is test for the add instruction:


  • Note the instruction sequence to load registers with literals and perform the 'add'. This is the actual test.
  • The data between 'start_expected' and 'end_expected' contains the registers that are expected to be written. The test harness will read this data from the compiled test.
This data-driven test allows our test harness to be fairly simple and completely data driven, as shown below:

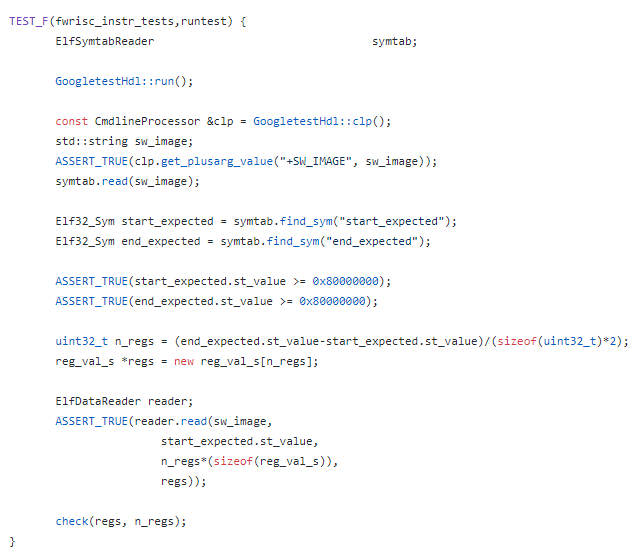
  • First, the test harness executes the simulation by calling GoogletestHdl::run()
  • Next, the test harness reads in the compiled test file, which has been specified with the +SW_IMAGE=<path> option
  • The start_expected..end_expected range is located and read in
  • Finally, the register contents are checked against the expected values specified in the test.

Results

After getting the unit-test structure in place, I almost-literally went down the list of RISC-V RV32I instructions and created a test for each as I implemented the instruction. The completed tests provided a nice safety net for catching issues introduced as new instructions were implemented, and as bugs were corrected. More issues were found as the RISC-V compliance tests were brought up and these issues prompted creation of new unit tests. 
The unit-test safety net has been incredibly helpful in quickly identifying regressions in the processor implementation, and helping to identify exactly which instructions are impacted. The unit-test experience also got me thinking about formal verification, and whether this could also be used as a form of unit-test suite. I'm getting ready to take another pass at shrinking the area required for the Featherweight RISC-V, and am thinking about creating a Formal unit-test suite to help in catching bugs introduced by that work. I'll talk about those experiments in a future post.
For now, I have a suite of 67 unit tests and 55 RISC-V compliance tests that provide a very good safety net to catch regressions in the Featherweight RISC implementation.

Disclaimer


The views and opinions expressed above are solely those of the author and do not represent those of my employer or any other party.

Saturday, December 8, 2018

FWRISC: Sizing up the RISC-V Architecture


After deciding on October 22nd to create a RISC-V implementation to enter in the 2018 RISC-V soft-core contest (with entries due November 26th), I needed to gather more information of the RISC-V ISA in general, and the RV32I subset of the ISA specifically. I had previously done some work in RISC-V assembly -- mostly writing boot code, interrupt handlers, and thread-management code. But I certainly hadn't explored the full ISA, and certainly not from the perspective of implementing it. Bottom line, I needed a better understanding of the ISA I needed to implement.

Fundamentals of the RISC-V ISA
The first thing to understand about the RISC-V architecture is that it came from academia. If you took a computer architecture course and read the Patterson and Hennesy book, you read about some aspects of one of the RISC-X family of instruction sets (RISC-V is, quite literally, the 5th iteration of the RISC architecture developed at UC Berkeley).

Due in part to its academic background, the ISA has both been extended and refined (restricted) over time -- sometimes in significant and sometimes in insignificant ways. This ability to both extend and change the ISA is somewhat unique when it comes to instruction sets. I'm sure many of you reading this are well-aware of some of the baggage still hanging around in the x86 instruction set (string-manipulation instructions, for example). While many internal protocols, such as the AMBA bus protocol, often take a path of complex early specification versions followed by simpler follow-on versions, instruction set architectures often remain more fixed. In my opinion, the fact that the RISC-V ISA had a longer time to incubate in a context that did not penalize backwards-incompatible changes has resulted in an architecture that is cleaner and easier to implement.

The RISC-V ISA is actually a base instruction-set architecture, and a family of extensions. The RV32I (32-bit integer) instruction set forms the core of the instruction-set architecture. Extensions add on capabilities such as multiply and divide, floating-point instructions, compressed instructions, and atomic instructions. Having this modular structure defined is very helpful in enabling a variety of implementations, while maintaining a single compiler toolchain that understands how to create code for a variety of implementations.
The RISC-V soft-core contest called for an RV32I implementation, though implementations could choose to include other extensions. The RV32I instruction set is actually very simple -- much simpler than other ISAs I've looked at in the past:
  • 32 32-bit general-purpose registers
  • Integer add, subtract, and logical-manipulation instructions
  • Control-flow instructions
  • Load/store instructions 
  • Exceptions, caused by a system-call instruction and address misalignment
  • Control and status registers (CSRs)
  • Cycle and instruction-counting registers
  • Interestingly enough, interrupts are not required
In total, the instruction-set specification states that there are 47 instructions. I consider the RV32I subset to actually contain 48 instructions, since ERET (return from exception) is effectively required by most RV32I software, despite the fact that it isn't formally included in the RV32I subset. 

On inspection, the instruction-set encoding seemed fairly straightforward. So, where were the implementation challenges?
  • CSR manipulation seemed a bit tricky in terms of atomic operations to read the current CSR value, while clearing/setting bits.
  • Exceptions always pose interesting challenges
  • The performance counters pose a size challenge, since they don't nicely fit in FPGA-friendly memory blocks
Despite the challenges, the RV32I architectural subset is quite small and simple. This simplicity, in my opinion, is the primary reason it was possible for me to create an implementation in a month of my spare time. 

Implementation Game Plan
For a couple or reasons, I elected to use a simple approach to implementation of the RISC-V ISA. First, the deadline for the contest was very close and I wanted to be sure to actually have an entry. Secondly, my thinking was that a simple implementation would result in a smaller implementation.
Since I was interested in evolving Featherweight RISC after the contest, a second-level goal with the initial implementation was to build and prove-out a test suite that could be used to validate later enhancements.

The implementation approach I settled on was state-machine based -- not the standard RISC pipelined architecture. Given that I was targeting an FPGA, I also planned to move as many registers as possible to memory blocks.

Next Steps
With those decisions made, I was off create an implementation of the RISC-V RV32I instruction set! In my next post, I'll discuss the test-driven development approach I took to implementing the Featherweight-RISC core.

Disclaimer


The views and opinions expressed above are solely those of the author and do not represent those of my employer or any other party.

Saturday, December 1, 2018

FWRISC: Designing an FPGA-friendly Core in 30 Days


Designing a processor is often considered to be a large and complex undertaking, so how did I decide to design and implement in a month? For a few reasons, really. For one, my background is in hardware design, despite having worked in the EDA (Electronic Design Automation) software industry for many years. The last time I did a full hardware design was quite a few years ago using an i386EX embedded processor and other packaged ICs. Recently, though, I've been looking for opportunities to brush up on my digital-design skills. The primary reason, however, was that I saw the call for contestants in the 2018 RISC-V soft-core processor contest. I've found contests to be a fun way to learn because the organizers' criteria often cause me to learn something I otherwise wouldn't have thought to investigate. This contest was certainly no different!

The 2018 RISC-V contest certainly had some unique criteria. The contest required that verification be done using the Verilator "simulator", an open-source Verilog to C++ translator that is very fast and powerful, but also has some interesting quirks. Also required was support for Zephyr, a real-time operating system (RTOS) that I certainly wasn't aware of before the contest. Most interesting to me, though, was the contest category for smallest RISC-V FPGA implementation.

Small, you say?
When thinking about processor design, I often think about maximizing performance. However, there are many applications -- especially in the IoT space -- where having a small amount of processing power that requires little resources is very important. Often these applications are dominated today by older processor architectures, such as the venerable 8051. Despite it's somewhat-small size in an FPGA implementation, the 8051 processor isn't terribly friendly to C compilers, and is very slow. What if a modern architecture, such as the RISC-V ISA, could take the place of these older architectures while matching, or even improving, on their small size?

Despite seeing the value of having small RISC-V implementations, my first reaction when seeing the contest announcement was puzzlement. Weren't there already several small RISC-V implementations? Well, as it turns out, yes and no. There were several existing small implementations. However, the ones I found were not truly compliant with the RV32I architecture specification. The tradeoffs taken were often taken to reduce the implementation size by removing features that required resources, but were not needed for the author's intended application. These tradeoffs often meant that a special compiler toolchain was needed, or that users needed to be cautious when attempting to reuse existing software written for the RISC-V ISA.

Results?
Well, bottom line, I was able to design, verify, and implement a 32-bit RV32I RISC-V core in 30 days, and you can find the code on GitHub. A netlist of the design is shown at the beginning of this post. Early results are quite promising with respect to the balance between performance and size, and there are several known areas for improvement. Through the process, I've learned a lot -- rediscovering RTL design, gaining a much deeper appreciation of the RISC-V ISA, and learning about new tools like Verilator and infrastructure like Zephyr. Over the next few weeks, I'll be writing more about specific details of the design and verification process and what I learned. So, stay tuned for future posts!

Disclaimer
The views and opinions expressed above are solely those of the author and do not represent those of my employer or any other party.

Sunday, September 2, 2018

Why Not an IDE?

As anyone (technical) who knows me can attest, I'm a big fan of Integrated Development Environments (IDEs). I've personally focused particularly on the Eclipse IDE, but I'm more generally a fan of the concept -- the notion that the task of developing code is different from the task of typing arbitrary text, and that programmers should be able to take advantage of these differences.

IDEs provide the ability to navigate large codebases with ease (and without grep), to productively leverage other's code without first committing it to memory, and to catch typing mistakes before running off to run a project build. And with an extensible IDE framework like Eclipse (and VSCode, for that matter), a programmer can get these benefits when working with a wide variety of languages -- C++, Java, SystemVerilog, Python, and more.

Recently, however, I've been puzzling over why more people don't use an IDE. What are the factors the hold them back? And, knowing this, what would enable them to get the benefits of an IDE?

Some of the reasons cited for not using an IDE are hard to counter. For example (with slight exaggeration): "I memorize all the code I work with, and don't make mistakes, so an IDE doesn't really provide me any value".

Other reasons hint at the startup efforts required, and the differences in use model. "I couldn't get my project properly configured for the IDE, and gave up after a couple of weeks". "I understand the benefits of an IDE, but my fingers just automatically launch Vi when I want to edit a file. Starting up the IDE seems to take so long!"

I'm particularly interested in this second category of reasons, since I suspect something can be done about these reasons for not getting the benefits of an IDE. I'm actually thinking about somewhat of a hybrid -- a simple editor launched from the shell that brings a fair number of the benefits delivered by a full integrated development environment.

What do you think? What are the reasons you've heard for not using an IDE? If you don't use an IDE, what are your reasons?


Wednesday, January 17, 2018

DVKit: Setting up SystemVerilog Development


In my last post on DVKit, I described how Eclipse uses projects to group source files, and uses workspaces to organize the projects and settings for a given development session. In this post, I'll start to dig into the support that DVKit provides for developing SystemVerilog.

DVKit includes the SVEditor plugin (http://sveditor.org), an open source Eclipse plug-in for developing SystemVerilog files. SystemVerilog is an object-oriented language that has similarities to C++ and Java. Unlike C++ and Java, though, SystemVerilog has strong ordering dependencies between files. C++ files can be independently analyzed because each C++ source file must include its dependencies and specify the namespace its content is in (if any). Java is even a bit more structured, requiring the class name and file name to match, and (effectively) requiring the directory structure to match the package namespace structure.

In contrast, all content in a SystemVerilog package must effectively be included in a single file. The pre-processor provides a level of workaround to enable classes to be stored in a separate file from the package file that includes them. However, this all adds up to make setting up source analysis for a SystemVerilog file a bit more detail-oriented than for other source languages.

In this post, I'll walk through setting up an Eclipse (DVKit) project for the UBus example from the UVM-1.2 library. I downloaded UVM here.

Creating a SystemVerilog Project

As mentioned in the last post, Eclipse makes it easy to create a project around existing source code. In this case, we know we will be working with SystemVerilog source, so we start by creating a new SVE Project. The wizard is found inside the SVEditor category, as shown below.


After selecting the proper wizard for project creation, we need to specify the particulars of the project:


Specifically, in this case:
  • ubus -- The name of the project
  • c:\usr1\fun\dvkit\uvm-1.2\examples\integrated\ubus -- The location of the ubus project within the UVM tree

Specifying Root Files

Since the ubus project contains existing sources, we next want to specify the root files so they can be indexed. SystemVerilog files need to be parsed in a very specific order, so it's important to only process the top-level files.

To do this, we first create a New Filelist on the Filelists page of the new SVE Project wizard. The filelist can be named anything, but the default (sve.f) is fine.


The next page is where the magic happens. 
  • Select the check box next to the 'ubus' project. This will cause all files with a SystemVerilog suffix (.sv, .svh, etc) to be selected
  • Click on the 'Compute Filelist' button. This pre-processes all source files and eliminates any files that are included by another. 
  • The resulting root files are displayed in the Filelist Contents box

Checking out the new Project

At this point, we've specified the root files in our project in such a way that the SVEditor plug-in can locate and parse them. We can now click Finish on the wizard and see the completed project.

Hmm... Okay, so we have a problem. Seems some macros from the UVM library can't be located. Of course, this isn't really surprising given than we haven't told the SVEditor plug-in to parse the UVM files.

Adding External Sources

Eclipse provides several ways to reference project-external source files. The easiest in this case is to just add the UVM library to the filelist that we already created.

We edit the sve.f file that we created during the project-creation process, and add two absolute paths to where we unpacked the UVM bundle:
  • +incdir+<uvm_install>/src
  • <uvm_install>/src/uvm_pkg.sv
After saving the file, we now have a project without errors.

Results


The payoff for properly configuring our SystemVerilog source project is that we can more-productively work with our SystemVerilog sources. In the screenshot above, the hover pop-up is displaying the documentation for the uvm_driver class. 

In future blog posts I'll dig into more features of Eclipse, DVKit, and plug-ins like SVEditor. For now, just a reminder that you can always download the completely open source DVKit here.

Sunday, January 7, 2018

DVKit: Workspaces, Projects, and Legacy Code


In Part 1 of this series, I introduced DVKit, an Eclipse-based IDE for files types used by DV engineers. If you're used to editing your source files with a single-file editor like Vi/Vim or Emacs, moving to an integrated development environment can take some getting used to. Single-file editors don't require any context (in fact, do not take advantage of any context) beyond the file on which they have been invoked. In contrast, IDEs require context for a file in order to provide many of the project-centric features that they provide.

Eclipse, like many integrated development environments, provides a variety of flexible features with which to specify the context of the files being developed. In this post, I'll describe the best practice fundamentals I've developed over the years when setting up development projects. Future posts will explore a few additional features that are very helpful in some cases.


Projects 

Eclipse provides two fundamental features for working with code: projects and workspaces (shown above). A project is represented by a directory that includes the sources being developed and some meta-data files with information about the language (eg Java) being used and how that language should be processed (eg assume Java 7). Some of this information is captured in a file named '.project' that is present in all Eclipse projects, and some will be captured in toolchain-specific files.

An Eclipse session can have multiple projects open at any given time.

Workspaces

Eclipse uses a workspace to capture a development session. A workspace records the projects that are open, the windows that are open and their positions and sizes, etc. In contrast to projects, a workspace typically does not contain any actual code -- just the preferences and settings used while developing code.

Projects are associated with a workspace in two ways:
  • When a project is created, it is automatically added to the active workspace
  • An existing project can be imported into the active workspace
In both cases, a link is added from the workspace to where the project is located on the filesystem. The project and its files will be visible in the workspace, but you are actually editing the files within the project directory, as shown in the diagram above.


I typically create a workspace for each codeline that I'm working on. So, I might have a workspace for "sveditor-master" and one for "sveditor-fast-indexer".

Working with Existing Code

If you're getting started with an Eclipse-based IDE like DVKit, you likely have lots of existing code and no existing Eclipse projects. So where do you start? Well, the good news is that Eclipse projects fit very nicely around existing code. You just need to decide what the primary language for the project is, and create the right project.

Let's say I want to work on files from the Linux Device Tree Compiler (DTC), and that I've cloned a copy of the repository (git://git.kernel.org/pub/scm/utils/dtc/dtc.git) to c:/usr1/fun/dvkit/tutorial/dtc.
After launching DVKit, I would launch the 'New C Project' wizard (New->Project... ) to create a new project for editing C code.


The next wizard allows me to provide specifics about the project I want to work on.


  • What is the project named? 'dtc'
  • Where is it located? On the filesystem at c:/usr1/fun/dvkit/tutorial/dtc
  • How are the source files compiled? With a Makefile
After completing this wizard, the 'dtc' project will be visible in the workspace:


Now the source files from the 'dtc' project are visible in the workspace and available for editing. In the future, we can bring the 'dtc' project into another workspace by running the Eclipse Import wizard to import an existing project.

Conclusion

The Eclipse project construct allows project-specific settings to be associated with source code, while the workspace construct enables users to manage session-specific settings. Eclipse's ability to construct a project around existing source code makes it easy to use Eclipse to develop existing code.

As always, you can download the freely-available Eclipse-based DVKit here: https://sourceforge.net/projects/dvkit/files/

Tuesday, January 2, 2018

DVKit: More-productive Code Development for DV Engineers


If you're a design verification (DV) engineer, how many different languages do you code in every day? If you're like me, the number is significant. On any given day, I might find myself working on SystemVerilog, PERL, shell script, Makefile, even C++. Text editors like Vim and a host of others can edit any text file, and even provide some basic syntax coloring.

How Do Integrated Development Environments Help?

Integrated Developmene Environments (IDEs) provide features far beyond those provided by simple text editors. While a text editor is typically aware of the current file being edited, an IDE is aware of the files related to the current file being edited. An IDE typically provides syntax and semantic checking for code as it is developed, which results in more accurate code creation and fewer mistakes being discovered during compilation. An IDE also provides features for navigating across the content of the code being developed -- for example, navigating to the declaration of a class from its usage. IDEs also provide on-the-fly content assist based on the declarations in the code under development -- for example, prompting the user with the methods available in a specific class.

There are a number of IDEs available, but many tend to focus on a handful of languages. Visual Studio, for example, focuses on C, C++, and C#. NetBeans focuses on Java and web languages. With the large variety of languages used for design verification, we need an IDE with support for the same large variety of languages.

Eclipse

If you're looking for a true integrated development environment (IDE) for multiple languages, the Eclipse platform is a natural choice. Originally developed by IBM as an integrated development environment for Smalltalk and Java, Eclipse has evolved into an open source platform that supports development of a dizzying array of languages -- from Java to C++ to ANTLR and beyond. As an integrated development environment, Eclipse not only provides text editing and syntax highlighting, it provides support for easily navigating code structure. For example, navigating from where a field is used to where it was declared.

DVKit

I've used Eclipse as a primary development tool for the past 12 years or so. Eclipse follows a plug-in-based architecture, and makes it easy to install new plug-ins for developing various languages. So, it's not terribly difficult to "roll your own" installation of Eclipse that contains your favorite plug-ins. About four years ago, I realized that there were two challenges with continuing to roll my own. First, it was time consuming. Remembering the web sites for all my favorite plug-ins and installing them every time a new version of Eclipse was released, on every development machine I use, was a hassle. Second, I didn't have a good way to share my favorite collection of Eclipse plug-ins with others.

So, about four years ago I created DVKit. DVKit is based on Eclipse and packages all my favorite plug-ins for developing languages such as:
  • SystemVerilog
  • PERL
  • Python
  • Shell
  • C/C++
  • Java
  • Javascript
  • Scala
  • Makefile
  • TCL
  • XML
  • YAML
DVKit is available for Linux, Windows, and Mac OS-X. On Windows, an installer is available to make it extra simple.

You can find DVKit at http://dvkit.org, and the downloads page here.

Over the next few blog posts, I'll introduce you to the fundamentals of developing code with DVKit and Eclipse, and some of the language-specific features provided with DVKit. In the meantime, I would encourage you to download DVKit and begin to explore how an IDE can help boost your development productivity.