Sunday, June 2, 2019

Functional Verification and the Ecosystem Argument

I've been involved in the functional verification space for quite some time -- both personally and professionally. On the personal side, I've recently been experimenting with using Python as a functional verification language. The simplest reason? The ecosystem.

The Ecosystem Argument
I've been involved in many discussions over the years that bring up The Ecosystem Argument. It goes something like this: If we use programming language X for Y (a plug-in language, a tool extension language, an implementation language, etc), we'll benefit from the ecosystem around language X. An ecosystem is a very powerful thing, and encompasses the language tools (editors, compilers, linting tools), the users that know a given language, and the available libraries for the language. So, the argument isn't entirely out of line. Using a popular language rather than an obscure language is often not a bad thing. That said, there's a hole in the generic form of The Ecosystem Argument: a programming language is used for many purposes, and much of the specialized knowledge is domain-specific and not language-specific. To put it another way, just because I know Python doesn't mean that I'm a Machine Learning guru -- despite the fact that Python is heavily used in this space.

All of these elements of a language ecosystem are important to consider. However, depending on the circumstances, some of these factors take on greater importance than others. If users will be using the language to create larger applications, the popularity of the language and availability of relevant libraries may take on increasing importance. If users will be using a domain-specific library (eg SystemC for modeling hardware with C++), the language may be less important than the semantics of the underlying domain because users will be more focused on expressing the semantics supported by the library than the semantics supported by the programming language.  

Libraries and Availability
In my experience, it's not a good assumption that selecting a particular programming language will bring a new group of users into a specific domain. It's possible, but not probable. What's more important is whether a group of users can easily be productive given the ecosystem around a given language.

A key aspect of language ecosystem and productivity is library availability. Libraries are present in all language ecosystems. In some cases (eg Java), the language specifies a rich library that satisfies the requirements of many users. In all cases, there are external libraries that serve more specialized needs. 

Getting access to these external libraries poses another challenge, and it's well worth noting any language whose ecosystem simplifies the process of acquiring and publishing libraries. If we're using C/C++ or Java, there are several steps we need to go through to acquire a new library:
  • Locate the project
  • Determine whether the project requires other libraries, and go find those
  • Determine where to install the library, and how our software will get access to it (eg co-locate it with our project, modify the library path, etc)
This model is pretty workable if we are building an large-scale application or library. The overhead of setting up libraries is typically low compared to the value provided by the application or library. This model becomes much more challenging when we're developing smaller pieces of functionality. In these cases, the overhead of acquiring and setting up the external library may equal or exceed the utility we get from the library. In these situations, it quickly starts to appear less expensive to just build something small that serves our needs rather than try to use an external library.

These situations come up all the time in functional verification. Here's just one example. One of the projects I worked on is a small RISC-V core. My testbench needed to get symbol information from the test files that the core executes as part of the test suite. Ideally, I could have used something like libelf or its successor elftools. However, that would require anyone that wanted to run the test suite for my core to also get and install this library. To avoid adding complication, I simply wrote my own simple ELF-file reader that could be included in the testbench.

Python and other languages address this lost opportunity for reuse by providing mechanisms to easily publish and acquire external libraries. Python has PyPi, the Python Package Index. Javascript has NPM. And, at least with Python, users don't need to have administrator privileges in order to install packages for their own use. 

In a functional verification environment, there are many other more-specialized cases where reuse is desired. The case described above is more generic, since many software projects have reasons to inspect ELF files. What about Bus Functional Models (BFMs)? What about specialized protocol generators? The possibility of being able to easily share and reuse some of these elements by leveraging Python's existing ecosystem is exciting!
 

Looking Forward
In my next few blogs, I plan to expand on how I'm using Python for functional verification and the benefits (and challenges) that I've experienced. So, stay tuned!


Disclaimer
The views and opinions expressed above are solely those of the author and do not represent those of my employer or any other party.


Saturday, March 2, 2019

Generate Custom Content Quickly with a Template Engine


I was at DVCon earlier this week, and attended the UVM Update Tutorial delivered by Cliff Cummings. Cliff described his typical process of creating UVM elements, which is to have a set of 'golden' template files that can be copied and hand-customized to the task at hand. It's certainly something I've done frequently on UVM projects and in many other contexts as well.

If you work in verification and you're anything like me, you create lots of files pretty much every day. Scripts, UVM code, C++ code, Makefiles, meta-data files, the list goes on and on. While all of these files will contain custom content, there is often a lot of boilerplate content as well. There are certainly specialized tools focused on quickly creating content for specific domains. For example, there are several tools and libraries to help quickly create UVM elements based on some high-level inputs from the user. But, what about files that are custom to your environment? Can we do better than the standard process of copy, rename, and then manually doing a search/replace in each file?

VTE
I've recently been playing with just such a template engine for my own use. For lack of a better name, I've been calling it the Verification Template Engine (VTE), since I'm largely using it for creating files in the context of a verification environment. VTE is implemented in Python and leverages the Jinja2 template engine, which is typically used for creating web content from a template.

Given how much VTE is just reusing existing functionality, what is the value-add? Two things, really:

  • VTE provides a user interface that makes it easy to see what templates are available in the environment
  • VTE specifies a template structure that makes it really easy to create new templates from those 'golden' template files that you would normally copy, rename, and modify.

Using Templates
VTE currently ships a couple of small templates with the tool. Your custom templates will be found via the VTE_TEMPLATE_PATH environment variable.

VTE currently supports two commands: list and generate. The list command shows the set of templates that were found on the template path.

% vte list
project.ivpm.googletest-hdl - IVPM project with Googletest-HDL dependence
verif.ip.googletest-hdl     - IP verification environment using Googletest-HDL
verif.uvm.test              - Creates a UVM test class
The generate command, as you might expect, generates content from a specified template. 

usage: vte generate [-h] [-force] template name [KEY=VALUE [KEY=VALUE ...]]

positional arguments:
  template    ID of template
  name        Name to use in the template
  KEY=VALUE   Specify other template variables

optional arguments:
  -h, --help  show this help message and exit
  -force      force overwrite of existing files

Here's an example using VTE to create the skeleton project structure that I use when developing an IP:

% vte generate project.ivpm.googletest-hdl my_proj
Note: processing template etc/ivpm.info
Note: processing template etc/packages.mf
Note: processing template etc/env.sh
Note: processing template scripts/ivpm.py
Note: processing template scripts/ivpm.mk
% find -type f
./etc/ivpm.info
./etc/packages.mf
./etc/my_proj_env.sh
./scripts/ivpm.py
./scripts/ivpm.mk
Creating Templates

Creating new template is simple as well. VTE. uses a marker file, named .vte to identify the root directory of a template. Any files in that directory or its subdirectories is considered to be a template file. The ID for a template is composed from the path elements between the VTE_TEMPLATE_PATH entry and the directory containing the .vte marker file.

For a very simple template, all you need is an empty .vte marker. However, adding a little information to the .vte file makes your template more useful. For example, you can add a short description for your template, which will be shown with the vte list command is run:

[template]
desc = Creates a UVM test class

The template files, themselves, use Jinja2 markup to refer to template parameters and specify directives.

/****************************************************************************
 * {{name}}.svh
 * 
 ****************************************************************************/
{%set filename = "{{name}}.svh" %}
/**
 * Class: {{name}}
 * TODO: Document UVM Test {{name}}
 */
class {{name}} extends {{base_class}};
 `uvm_component_utils({{name}})
 
 function new(string name, uvm_component parent=null);
  super.new(name, parent);
 endfunction
 
endclass

The example above is a template for a UVM Test class. The {% set filename ... %} directive specifies the name of the output file, which depends on the value of the name parameter. The rest of the template contains a reference to the name parameter wherever we want that to be substituted in. As you can probably guess, these locations where {{name}} is referenced are the very locations that you'd go through with a text editor and manually substitute in some content.


Sound Interesting?
If this all sounds interesting, check out VTE on GitHub: https://github.com/fvutils/vte. You can download a release tarball from the Releases area, add the bin directory to your PATH, and try it out right away. You can also find documentation in the README file.
If you find an issue with VTE, or would like to see it support a new feature, file a ticket on the GitHub issue tracker. Even better, send me a pull request!

My hope is that a tool like VTE can make creating boilerplate code much simpler and faster, allowing you to focus your efforts on adding truly-unique content. That is, after all, always the goal of engineering and automation, right?


Sunday, January 13, 2019

EDAPack: Simplifying Development-Tool Management


One of my first "real" engineering courses during my college days centered around scripting and working with Unix, and the professor really emphasized that any repetitive task was a candidate for automation. It's a point that resonated with me at the time, and I continue to question whether any mind-numbing and multi-step process I face should be automated.

Challenges of Managing EDA Tools
One of those mind-numbing processes I've been facing recently is managing my installations of development tools -- specifically, the electronic design automation (EDA) tools that I use to simulate and synthesize Verilog hardware descriptions and develop the embedded software that runs on those devices.
In my experience, EDA tools are a bit different than the standard software that might be installed by default on your Linux workstation:
  • EDA software is enough of a niche market that builds will either just not be available for your Linux distribution, or will be an older version of the software.
  • I often need to install EDA software on machines where I don't have root access, so it wouldn't help me much if the Linux distribution provided a pre-built version of the software
  • I often don't have control over the Linux distribution and version that I have to use. CentOS/RHEL 6, released in 2011, is still quite common and will likely continue to be common since support is offered through 2020.
  • It's often necessary to have several versions of EDA software installed at a given time. Projects often have a dependency on a specific version -- at least until a newer version is validated, so multiple versions must coexist
These challenges, in and of themselves, make maintaining a collection of EDA tools time-consuming.

Challenges of Managing OSS EDA Tools
When it comes to working with open-source EDA tools, there is another level of complexity. These tools are often provided in source form, so they must be installed by the end user. EDA software, like any other, can be complex and can have dependencies on additional software packages. Compiling SymbiYosys, the open-source formal-analysis tool, requires that the source for seven other packages be fetched, compiled, and installed. This is complex enough when the user has administrator access to the machine and can install needed development libraries. Without administrator access, this process becomes incredibly complex. And, of course, when a new version of one of the packages is released, the whole process must be repeated.

Introducing EDAPack
I created EDAPack, which I consider to be in an Alpha state, to address the challenges I describe above. You can think of EDAPack has having two main components, as shown in the diagram below:


First off is the base set of tools, shown in the bottom box. EDAPack contains an installation of Environment Modules, which is a software package that is somewhat-widely used to manage configuring the environment for different software tools. Modules makes it easy to configure the environment with the right mix of tool versions with a minimum of fuss. EDAPack also contains an installation of Python3, a software package that is increasingly required to run open-source software tools, but is somewhat difficult to get correctly-installed on older Linux distributions. Finally, EDAPack contains scripts to manage installation of tools into the EDAPack tree.

The second part of EDAPack is most significant for those of you that are using open-source tools, such as a GCC cross-compiler or one of the open-source Verilog simulators. A key aspect of EDAPack's mission is to provide pre-compiled versions of these packages that can simply be installed and used, skipping all the complexities of installing development libraries and compiling required dependencies. Right now, just a few packages are setup to be used in this way, but the goal is to expand that set based on user demand.

Now, providing pre-compiled software is always an interesting proposition in a Linux environment. Different distributions provide different versions of tool and libraries, making it difficult to deliver software that will run on a variety of distributions. EDAPack compiles packages on CentOS 6, then tests the software on a variety of Linux distributions (courtesy of Docker), ensuring that the software will run correctly on a wide variety of Linux distributions.

How does it Work?
Getting started is actually pretty simple (and that's by design): just download EDAPack from the GitHub release page. After installing EDAPack, you'll want to source a setup script in the EDAPack 'etc' directory (<edapack>/etc/edapack.sh) in order to configure some initial paths.

From there, you'll probably want to install some software. This can be done using the edapack avail command to list software that is available to install:


Once you know which software you'd like to install, the edapack install command is used to  fetch and install the software into the EDAPack tree. For example, edapack install verilator fetches a pre-built version of Verilator from the release area on GitHub and installs it into the EDAPack tree.

Before using software from the EDAPack tree, you will use the module tool (provided by Environment Modules) to list the installed packages and load tools into your environment. Here's the output from module avail, which lists the installed tools. 

We can see that symbiyosys and verilator are installed. We can load a specific version of these tools, or specify the 'latest' version to get the newest installed version.

In other words, simply issuing the command module load verilator/latest will setup our environment to use the latest-installed version of Verilator.

Current Status and Call to Action

Currently, EDAPack is newly-released, provides a bare minimum of packages (Verilator, Icarus Verilog, and SymbiYosys), and provides support for Linux only. EDAPack is useful to me, and I'll continue to evolve it to meet my needs. However, I'm very interested in whether EDAPack could be useful to you as well.

Are you an EDA user? What tools would you like to see delivered in this way? What OS (Linux distro or other) do you use, and would like to ensure is supported?

Are you an author of open-source engineering software? Would you like to have your software made available to users in this way?

Do you have other ideas of what might be possible with a framework like this?

EDAPack is designed to enable hardware and embedded-software developers focus on developing their designs, not on compiling their development tools. I'm interested in your input on whether you feel EDAPack is a useful concept and, if so, what could make it even more useful to you. Feel free to comment on the blog, or file requests on GitHub. What tools are in your pack?


Saturday, December 15, 2018

FWRISC: Creating a Unit-test Safety Net


When developing software, I've become very comfortable with test-driven development -- a methodology that calls for tests to be developed along with, or even before, functionality. It's quite common for me to develop a test first, which obviously fails initially, and implement functionality until the test passes.
I have typically approached hardware verification from a very different perspective. When doing verification, I've typically started with a hardware block that is largely functional, or at least is believed to be largely functional. My work then begins with test plan development and some detective work to ferret out the potentially-problematic areas of the design that require targeted tests.

When developing the FWRISC RISC-V core, I initially started off taking a verification approach. One of the requirements for the RISC-V contest was that cores must pass the RISC-V Compliance Tests. So, I started off by attempting to run one of the compliance tests. I quickly realized that there were some challenges with this approach:
  • Even for testing a simple feature, the RISC-V compliance tests are quite complicated. All involve exception instructions. All involve multiple instructions that are unrelated to the instruction that is ostensibly the target of the test. This isn't uncommon for verification, of course.
  • Taking a verification approach early in the development cycle means that debugging is incredibly painful. Tracking down a small issue with the core by looking at the test result of a test that consists of a hundred or so instructions is incredibly painful -- just see the waveform at the top of this blog post which comes from the test for the 'add' instruction.
  • In contrast, see the following waveform that shows the entire 'add' unit test. While it's longer than a single instruction, this test consists of a total of 6 instructions. This means that there's much less to look at when a problem needs to be debugged.


Creating a Testbench

My verification background is SystemVerilog and UVM, so one early complication I faced when developing tests for the Featherweight RISC core was that the RISC-V soft-core context explicitly required the use of Verilator as a simulator. Verilator is, in some senses, a simulator for the synthesizable subset of SystemVerilog. In other senses, it's a Verilog to C++ translator that can be used as to create a C++ version of a synthesizable Verilog description to bind in to a C++ program. Compared to a simulator, think of it, not as a house, but as a pile of lumber, tools, and a blueprint from which you can build a house (which, by the way, is in no way an attempt to minimize the value of Verilator -- just point out some of the required legwork). 

The fact that Verilator produces a C++ model of the SystemVerilog RTL brought to mind the unit-testing library that I invariably use when testing C++ code. Googletest is a very handy library for organizing and executing a suite of C++ unit tests:
      • Collects and categorizes tests
      • Enables common functionality to be centralized across tests
      • Provides result-checking macros/assertions
      • Executes an entire test suite, a subset, or a single test
      • Reports test status
In addition to using Googletest for standard C++ applications, I had used the Googletest framework to manage some early device firmware written in C when testing it against Verilog RTL being verified in a UVM testbench. This approach seemed close enough to what I was looking to do with Featherweight RISC and Verilator that I ended up extending that project (named googletest-hdl) to support Verilator. While the contest required the use of Verilator, I wanted to setup my basic test suite such that it could run with other simulators. Since the googletest-hdl project already supported running with SystemVerilog and UVM, I was covered there.

The Featherweight RISC testbench block diagram is shown below:


The design is instantiated in the HDL portion of the testbench. This testbench portion will run in Verilator or another Verilog simulator. The Googletest portion of the testbench contains the test suite and code needed to check test results. There are two points at which the environments communicate: the run-control path by which the Googletest environment instructs the HDL environment to run, and the tracer API path by which events are sent from the processor to the testbench environment.
The tracer API path is the key to checking test results. The following events are sent to the Googletest environment as SystemVerilog DPI calls:
  • Instruction-execution event
  • Register-write event
  • Data-access event
Now that we have this testbench structure, we can create some tests.

Creating Tests

When it comes to unit tests, I usually find that the initial test structure is successively refined as I discover more and more commonality between the tests. Frankly, the ideal unit test is almost-entirely data driven, and the Featherweight RISC tests are very close to this ideal.

The unique aspects of the instruction unit tests are stored in the test files themselves. Here is test for the add instruction:


  • Note the instruction sequence to load registers with literals and perform the 'add'. This is the actual test.
  • The data between 'start_expected' and 'end_expected' contains the registers that are expected to be written. The test harness will read this data from the compiled test.
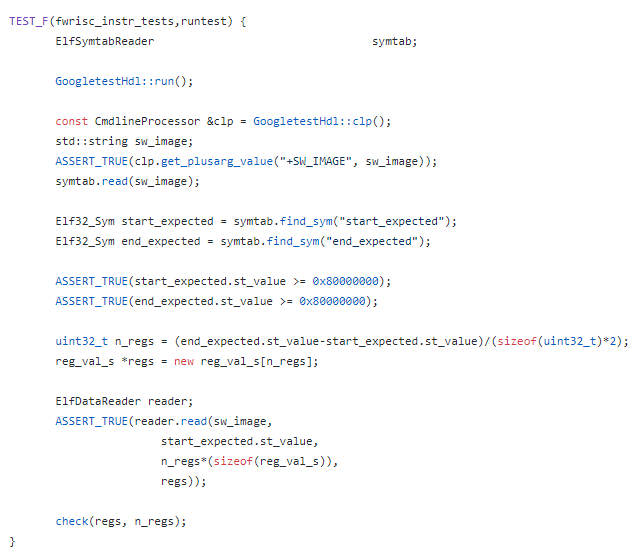
This data-driven test allows our test harness to be fairly simple and completely data driven, as shown below:

  • First, the test harness executes the simulation by calling GoogletestHdl::run()
  • Next, the test harness reads in the compiled test file, which has been specified with the +SW_IMAGE=<path> option
  • The start_expected..end_expected range is located and read in
  • Finally, the register contents are checked against the expected values specified in the test.

Results

After getting the unit-test structure in place, I almost-literally went down the list of RISC-V RV32I instructions and created a test for each as I implemented the instruction. The completed tests provided a nice safety net for catching issues introduced as new instructions were implemented, and as bugs were corrected. More issues were found as the RISC-V compliance tests were brought up and these issues prompted creation of new unit tests. 
The unit-test safety net has been incredibly helpful in quickly identifying regressions in the processor implementation, and helping to identify exactly which instructions are impacted. The unit-test experience also got me thinking about formal verification, and whether this could also be used as a form of unit-test suite. I'm getting ready to take another pass at shrinking the area required for the Featherweight RISC-V, and am thinking about creating a Formal unit-test suite to help in catching bugs introduced by that work. I'll talk about those experiments in a future post.
For now, I have a suite of 67 unit tests and 55 RISC-V compliance tests that provide a very good safety net to catch regressions in the Featherweight RISC implementation.

Disclaimer


The views and opinions expressed above are solely those of the author and do not represent those of my employer or any other party.

Saturday, December 8, 2018

FWRISC: Sizing up the RISC-V Architecture


After deciding on October 22nd to create a RISC-V implementation to enter in the 2018 RISC-V soft-core contest (with entries due November 26th), I needed to gather more information of the RISC-V ISA in general, and the RV32I subset of the ISA specifically. I had previously done some work in RISC-V assembly -- mostly writing boot code, interrupt handlers, and thread-management code. But I certainly hadn't explored the full ISA, and certainly not from the perspective of implementing it. Bottom line, I needed a better understanding of the ISA I needed to implement.

Fundamentals of the RISC-V ISA
The first thing to understand about the RISC-V architecture is that it came from academia. If you took a computer architecture course and read the Patterson and Hennesy book, you read about some aspects of one of the RISC-X family of instruction sets (RISC-V is, quite literally, the 5th iteration of the RISC architecture developed at UC Berkeley).

Due in part to its academic background, the ISA has both been extended and refined (restricted) over time -- sometimes in significant and sometimes in insignificant ways. This ability to both extend and change the ISA is somewhat unique when it comes to instruction sets. I'm sure many of you reading this are well-aware of some of the baggage still hanging around in the x86 instruction set (string-manipulation instructions, for example). While many internal protocols, such as the AMBA bus protocol, often take a path of complex early specification versions followed by simpler follow-on versions, instruction set architectures often remain more fixed. In my opinion, the fact that the RISC-V ISA had a longer time to incubate in a context that did not penalize backwards-incompatible changes has resulted in an architecture that is cleaner and easier to implement.

The RISC-V ISA is actually a base instruction-set architecture, and a family of extensions. The RV32I (32-bit integer) instruction set forms the core of the instruction-set architecture. Extensions add on capabilities such as multiply and divide, floating-point instructions, compressed instructions, and atomic instructions. Having this modular structure defined is very helpful in enabling a variety of implementations, while maintaining a single compiler toolchain that understands how to create code for a variety of implementations.
The RISC-V soft-core contest called for an RV32I implementation, though implementations could choose to include other extensions. The RV32I instruction set is actually very simple -- much simpler than other ISAs I've looked at in the past:
  • 32 32-bit general-purpose registers
  • Integer add, subtract, and logical-manipulation instructions
  • Control-flow instructions
  • Load/store instructions 
  • Exceptions, caused by a system-call instruction and address misalignment
  • Control and status registers (CSRs)
  • Cycle and instruction-counting registers
  • Interestingly enough, interrupts are not required
In total, the instruction-set specification states that there are 47 instructions. I consider the RV32I subset to actually contain 48 instructions, since ERET (return from exception) is effectively required by most RV32I software, despite the fact that it isn't formally included in the RV32I subset. 

On inspection, the instruction-set encoding seemed fairly straightforward. So, where were the implementation challenges?
  • CSR manipulation seemed a bit tricky in terms of atomic operations to read the current CSR value, while clearing/setting bits.
  • Exceptions always pose interesting challenges
  • The performance counters pose a size challenge, since they don't nicely fit in FPGA-friendly memory blocks
Despite the challenges, the RV32I architectural subset is quite small and simple. This simplicity, in my opinion, is the primary reason it was possible for me to create an implementation in a month of my spare time. 

Implementation Game Plan
For a couple or reasons, I elected to use a simple approach to implementation of the RISC-V ISA. First, the deadline for the contest was very close and I wanted to be sure to actually have an entry. Secondly, my thinking was that a simple implementation would result in a smaller implementation.
Since I was interested in evolving Featherweight RISC after the contest, a second-level goal with the initial implementation was to build and prove-out a test suite that could be used to validate later enhancements.

The implementation approach I settled on was state-machine based -- not the standard RISC pipelined architecture. Given that I was targeting an FPGA, I also planned to move as many registers as possible to memory blocks.

Next Steps
With those decisions made, I was off create an implementation of the RISC-V RV32I instruction set! In my next post, I'll discuss the test-driven development approach I took to implementing the Featherweight-RISC core.

Disclaimer


The views and opinions expressed above are solely those of the author and do not represent those of my employer or any other party.

Saturday, December 1, 2018

FWRISC: Designing an FPGA-friendly Core in 30 Days


Designing a processor is often considered to be a large and complex undertaking, so how did I decide to design and implement in a month? For a few reasons, really. For one, my background is in hardware design, despite having worked in the EDA (Electronic Design Automation) software industry for many years. The last time I did a full hardware design was quite a few years ago using an i386EX embedded processor and other packaged ICs. Recently, though, I've been looking for opportunities to brush up on my digital-design skills. The primary reason, however, was that I saw the call for contestants in the 2018 RISC-V soft-core processor contest. I've found contests to be a fun way to learn because the organizers' criteria often cause me to learn something I otherwise wouldn't have thought to investigate. This contest was certainly no different!

The 2018 RISC-V contest certainly had some unique criteria. The contest required that verification be done using the Verilator "simulator", an open-source Verilog to C++ translator that is very fast and powerful, but also has some interesting quirks. Also required was support for Zephyr, a real-time operating system (RTOS) that I certainly wasn't aware of before the contest. Most interesting to me, though, was the contest category for smallest RISC-V FPGA implementation.

Small, you say?
When thinking about processor design, I often think about maximizing performance. However, there are many applications -- especially in the IoT space -- where having a small amount of processing power that requires little resources is very important. Often these applications are dominated today by older processor architectures, such as the venerable 8051. Despite it's somewhat-small size in an FPGA implementation, the 8051 processor isn't terribly friendly to C compilers, and is very slow. What if a modern architecture, such as the RISC-V ISA, could take the place of these older architectures while matching, or even improving, on their small size?

Despite seeing the value of having small RISC-V implementations, my first reaction when seeing the contest announcement was puzzlement. Weren't there already several small RISC-V implementations? Well, as it turns out, yes and no. There were several existing small implementations. However, the ones I found were not truly compliant with the RV32I architecture specification. The tradeoffs taken were often taken to reduce the implementation size by removing features that required resources, but were not needed for the author's intended application. These tradeoffs often meant that a special compiler toolchain was needed, or that users needed to be cautious when attempting to reuse existing software written for the RISC-V ISA.

Results?
Well, bottom line, I was able to design, verify, and implement a 32-bit RV32I RISC-V core in 30 days, and you can find the code on GitHub. A netlist of the design is shown at the beginning of this post. Early results are quite promising with respect to the balance between performance and size, and there are several known areas for improvement. Through the process, I've learned a lot -- rediscovering RTL design, gaining a much deeper appreciation of the RISC-V ISA, and learning about new tools like Verilator and infrastructure like Zephyr. Over the next few weeks, I'll be writing more about specific details of the design and verification process and what I learned. So, stay tuned for future posts!

Disclaimer
The views and opinions expressed above are solely those of the author and do not represent those of my employer or any other party.

Sunday, September 2, 2018

Why Not an IDE?

As anyone (technical) who knows me can attest, I'm a big fan of Integrated Development Environments (IDEs). I've personally focused particularly on the Eclipse IDE, but I'm more generally a fan of the concept -- the notion that the task of developing code is different from the task of typing arbitrary text, and that programmers should be able to take advantage of these differences.

IDEs provide the ability to navigate large codebases with ease (and without grep), to productively leverage other's code without first committing it to memory, and to catch typing mistakes before running off to run a project build. And with an extensible IDE framework like Eclipse (and VSCode, for that matter), a programmer can get these benefits when working with a wide variety of languages -- C++, Java, SystemVerilog, Python, and more.

Recently, however, I've been puzzling over why more people don't use an IDE. What are the factors the hold them back? And, knowing this, what would enable them to get the benefits of an IDE?

Some of the reasons cited for not using an IDE are hard to counter. For example (with slight exaggeration): "I memorize all the code I work with, and don't make mistakes, so an IDE doesn't really provide me any value".

Other reasons hint at the startup efforts required, and the differences in use model. "I couldn't get my project properly configured for the IDE, and gave up after a couple of weeks". "I understand the benefits of an IDE, but my fingers just automatically launch Vi when I want to edit a file. Starting up the IDE seems to take so long!"

I'm particularly interested in this second category of reasons, since I suspect something can be done about these reasons for not getting the benefits of an IDE. I'm actually thinking about somewhat of a hybrid -- a simple editor launched from the shell that brings a fair number of the benefits delivered by a full integrated development environment.

What do you think? What are the reasons you've heard for not using an IDE? If you don't use an IDE, what are your reasons?