
As I mentioned in my last post, I've been looking at using Python for more tasks, including functional verification. My go-to languages for functional verification have traditionally been SystemVerilog for professional work, and C++ when I'm working on a personal project. I've started doing more of my small-application development in Python (often as an alternative to C++), and have wondered whether I could also migrate my testbench development from C++ to Python as well.
This blog post provides an introduction to an integration I created between Python and an hardware descriptin language (HDL) simulation environment called Py-HPI (for Python HDL Procedural Interface). I'm far from the first to create an integration between Python and an HDL simulator (I'm aware of at least one formal project, and several others users that have written about their integration work), so what is different about Py-HPI?
Well, two things, really in my opinion:
- Py-HPI integrates at the procedural level, which means Python can directly call tasks in the HDL environment instead of interacting with signals in the HDL environment.
- Py-HPI provides a high degree of automation for setting up this procedural-level integration.
In this blog post, I will be describing the user experience in using Py-HPI. In future blog posts, I'll walk through how Py-HPI integrates on my go-to project for playing with verification technologies, and I'll go more in-depth on how Bus Functional Models (BFMs) and testbench environments are developed for Py-HPI.
Py-HPI: The Big Picture
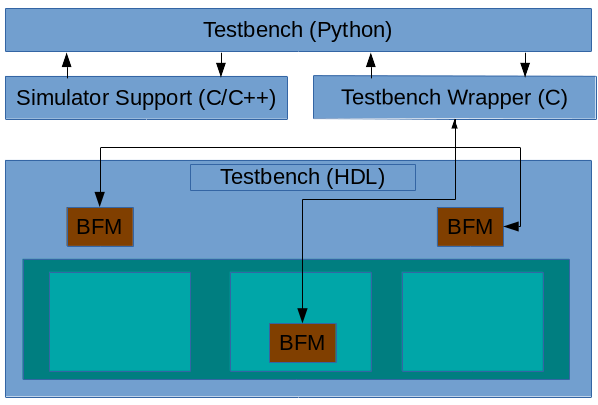
The structure of a Py-HPI enabled testbench is shown above. The key elements are described below
- Testbench (Python) -- This is Python code the user writes to interact with the design running within the HDL simulation environment
- Simulator Support -- This is C/C++ code generated by Py-HPI that implements the integration with a specific type of simulator. In general, this code is independent of the specific testbench
- Testbench Wrapper -- This is C code generated by Py-HPI that implements the testbench specifics of the integration between Python and the HDL environment
- Bus Functional Models (BFMs) -- BFMs written in HDL (eg SystemVerilog) implement the translation between task calls and signal activity and vice versa.
Currently, Py-HPI supports standard SystemVerilog-DPI simulators (eg Modelsim) as well as Verilator. More integrations are planned, including support for Verilog simulators like Icarus Verilog.
Py-HPI: A Small Example
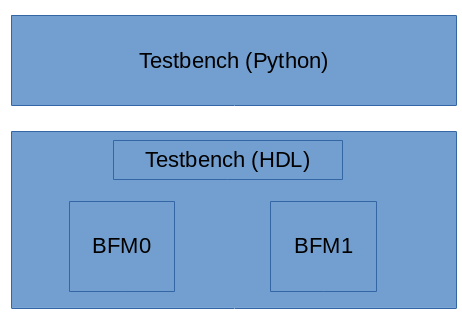
One easy way to get a sense for the user experience when using Py-HPI is to walk through the steps to run a very simple testbench environment. One of the Py-HPI examples provides just such a testbench.
The structure of this testbench environment is shown above. The Python portion of the testbench drives the SystemVerilog HDL testbench via two bus functional models that are instanced in the SystemVerilog environment.
Python Testbench
First, let's take a look at the Python testbench code, which you can find here:
def thread_func_1():
  print("thread_func_1")
  my_bfm = hpi.rgy.bfm_list[0]
  for i in range(1000):
    my_bfm.xfer(i*2)

def thread_func_2():
  print("thread_func_2")
  my_bfm = hpi.rgy.bfm_list[1]
  for i in range(1000):
    my_bfm.xfer(i)

@hpi.entry
def run_my_tb():
    print("run_my_tb - bfms: " + str(len(hpi.rgy.bfm_list)))

    with hpi.fork() as f:
      f.task(lambda: thread_func_1());
      f.task(lambda: thread_func_2());

    print("end of run_my_tb");
In a way, it's almost identical to what I would write in either C++ or SystemVerilog. In a way, that's kind of the point from my perspective.
Running the Testbench
Okay, now that we know what the Python side of the testbench looks like, let's see the commands used to create and compile the files necessary to run a simulation. These commands are in the runit_vl.sh script inside the example directory. In this case, I'll show the commands required to run Py-HPI with the Verilator simulator. The example also provides a script (runit_ms.vl) that runs the same example with Modelsim.
Create the Simulation Support Files
We first need to create the simulation-support files. Since we're targeting the Verilator simulator, we need to run the 'gen-launcher-vl' subcommand implemented by the Py-HPI library.
python3 -m hpi gen-launcher-vl top -clk clk=1ns
Verilator is a bit of an outlier, in that the simulation-support files are specific to the HDL design being simulated. Consequently, we need to specify the name of the top Verilog module and the clock name and period.
Create the Testbench Wrapper
Now, we need to create the Testbench wrapper file that will support the specific BFMs instantiated inside the testbench.
python3 -m hpi -m my_tb gen-bfm-wrapper simple_bfm -type sv-dpi
python3 -m hpi -m my_tb gen-dpi
Because the Verilator simulator supports DPI, we generate a DPI-based testbench wrapper for our testbench that uses a single BFM. The resulting testbench wrapper is implemented in C and provides the connection between SystemVerilog and Python for our BFM.
Compile Everything
This step is very specific to the simulator being used.
# Query required compilation/linker flags from Python
CFLAGS="${CFLAGS} `python3-config --cflags`"
LDFLAGS="${LDFLAGS} `python3-config --ldflags`"

verilator --cc --exe -Wno-fatal --trace \
 top.sv simple_bfm.sv \
 launcher_vl.cpp pyhpi_dpi.c \
 -CFLAGS "${CFLAGS}" -LDFLAGS "${LDFLAGS}"

make -C obj_dir -f Vtop.mk
Since we're using Verilator, we need to run Verilator to compile the HDL files and the simulator-support and testbench wrapper C/C++ files. Verilator generates C++ source and a Makefile to build the final simulator image. Our last step is to build the Verilator simulation image using the Verilator-created Makefile.
Run it!
Finally, we can run our simulation.
./obj_dir/Vtop +hpi.load=my_tb +vl.timeout=1ms +vl.traceWe pass a few additional plusargs to enable specific behavior:
- The +hpi.load=my_tb specifies the Python module to load
- The +vl.timeout=1ms specifies that the simulation should run for a maximum of 1ms. Other simulators will, of course, provide different mechanisms for doing this
- The +vl.trace argument specifies that waveforms should be created. Other simulators will provide different ways of turning on tracing.
So, all in all, Py-HPI makes it quite easy to connect a Python testbench to an HDL simulator at the procedural level.
Conclusion
In this blog post, I introduced Py-HPI, a procedural interface between Python and an HDL testbench environment along with an overview of the user experience when creating and running a testbench with Py-HPI. In my next post, I'll look at a Py-HPI testbench for my FWRISC RISC-V core and compare the new Python testbench with the existing C++ testbench. Until then, feel free to check out the Py-HPI library on GitHub (https://github.com/fvutils/py-hpi) and I'd be interested to hear your experiences in using Python for functional verification.
Disclaimer
The views and opinions expressed above are solely those of the author and do not represent those of my employer or any other party.
No comments:
Post a Comment