
Controlling the outside world -- specifically interface BFMs -- from embedded software is critical to SoC integration tests that exercise interface IP. In the last post, we showed how to pass data from embedded software to Python by tracing execution of the processor core and reading the mirrored values of registers and memory to obtain parameter values. While functional, doing things in this way is highly specific to one message-passing approach and is pretty labor intensive. In this post, we'll add some abstraction and automation to improve usability and scalability.
Design Goals

While we're initially focused on providing a nice automated way to communicate between embedded software and the test harness in a simulation environment, the design goals go beyond this. The diagram above shows the basic architecture. Endpoints provide a portal for one environment to call APIs in another environment. Each endpoint supports a known set of APIs, and different endpoints will support different sets of APIs.
Each environment interacts with APIs on an endpoint without needing to know how communication is implemented. For example, execution trace might be used to implement processor to Python communication in a simulation-based environment. When the design is synthesized to FPGA, communication might be implemented via an external interface. With appropriate abstraction, neither the test software running on the processor nor the Python test code should need to change despite the fact that data is being moved in very different ways.
In order for this to be feasible, we'll need to collect some meta-data about the APIs.
Example
I always find an example to be helpful, so let's look at the enhancements to the flow in the context of a simple example.

Bus functional models (BFMs) or Verification IP (VIP) provide very effective ways to interact with interface protocols from testbench code. What we need in addition is a way to control these BFMs from the software running on the core in the design.
Capturing the API
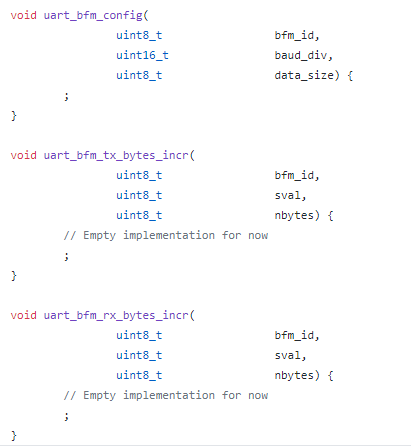
Let's focus on the UART for now. Our UART BFM provides a detailed API for configuring individual attributes of the UART protocol (eg baud-rate divisor) and for interacting with the UART protocol a byte at a time. That's fine for IP-level testing, but is a bit too low-level for software-driven testing.
For software-driven testing, we want to instruct the BFM to do some reasonable amount of work and let it go. To help with this, the UART BFM defines a higher-level API intended for use by software.

An example of that higher-level API is shown above. Calling the uart_bfm_tx_bytes_incr API causes the BFM to begin sending a stream of bytes starting with a specific value and incrementing. There is another API that instructs the BFM to expect to receive a stream of bytes sent by the software running on the processor.
To enable automation, we describe the Python API that we will call from embedded software using special annotations. We collect related APIs together in a class, and identify whether these methods are exported by the Python environment and will be called by the embedded software, or are imported by the Python and will be called by Python code.

Since we want embedded software to call this API, the API is considered to be exported by Python. You can also see the configuration function that updates the UART's configuration (eg baud rate).
Each of the method parameters is given a Python3 type annotation. This enables the Python libraries to know the type of each parameter and collect the right data to pass when the functions are called.
On the C side, we simply need to have functions with the same signature as what we've captured in the Python API definition.
Connecting to Implementation: Python
Connecting all of this up on the Python side involves connecting the relevant BFMs and API implementations together.
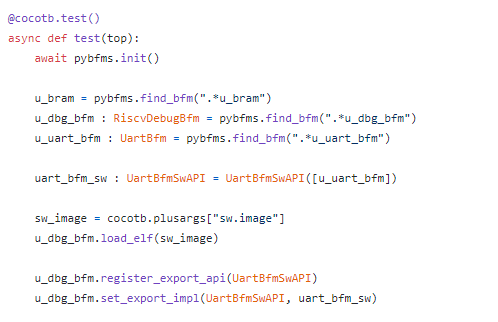
Once we have all the BFMs, we can create an instance of the higher-level UART BFM API (uart_bfm_sw) and tell the debug BFM that it should handle the embedded software calling these APIs.
 The software test snippet above transmits some data via the UART to the waiting UART BFM to check (link). Before we can send data, both the UART IP and the external BFM need to be configured in the same way. We program the UART IP via its registers, and call the uart_bfm_config function to cause the corresponding Python method to be invoked. This will cause the UART BFM mode to be configured.
Example C-Test
With the BFMs connected on the Python side, we can now focus on how to interact with the BFM from the software test.

Next, we call the uart_bfm_rx_bytes_incr to tell the UART BFM that it should expect to receive 20 bytes. It should expect the first byte to have a value 10 and subsequent bytes to increment by one. By telling the BFM what to expect, our test is self-checking and the required amount of interaction is small.
Finally, we again interact with the UART IP actually send the data that the BFM is expecting.
Next Steps
The API definition and Endpoint architecture described in the post above provides a modular way to capture the APIs used to communicate across environments. Because the API signature is captured in machine-readable way, it also enables the use of automation when implementing the APIs for different environments.
As I mentioned at the beginning of the post, the API and Endpoint architecture is designed so it can be applied in many verification environments -- it's certainly not restricted to just communicating between embedded software test and the test harness. I've been interested for a while in methodology for creating and verifying firmware along with the IP that it controls such that it's ready to go when SoC-integration testing begins. My next post will begin exploring how to create, verify, and deliver firmware along with an IP.
References
- pybfms-uart -- https://github.com/pybfms/pybfms-uart
- hvl-rpc -- https://github.com/fvutils/pyhvl-rpc
- tiny-soc -- https://github.com/mballance/tiny-soc
Disclaimer
The views and opinions expressed above are solely those of the author and do not represent those of my employer or any other party.
No comments:
Post a Comment