Saturday, July 27, 2019

Embedded Languages: The Space Between Language and API


We're all familiar with general-purpose programming language for capturing general algorithms, but there are also a sizeable group of domain-specific languages that exist to efficiently capture reasoning in a specific domain -- whether that's hardware design (Verilog, VHDL), database manipulations (SQL), or models at a high level of abstraction (UML/xtUML). These languages exist because the overhead is enormous for a domain expert to capture a problem in their given domain using a general-purpose programming language and APIs.

One of my favorite examples showing the motivation for domains-specific languages is spreadsheets. A spreadsheet is a language based around a namespace (table) where elements (cells) in the namespace are addressable by their coordinates, and whose values are represented by equations that may include references to other elements in the namespace. Just think how easy it is to setup a simple spreadsheet to do some what-if analysis, and how difficult it would be if you had to write a program to perform those calculations instead!

Simplistic though it may be, the spreadsheet perfectly captures the motivation behind domain-specific languages: focus on capturing the what of a given domain -- the key attributes, key relationships, and key operations -- and not on the how of the mechanics of how these elements would be represented in a general-purpose programming language. In short, a domain-specific language provides a user interface to complex algorithms phrased in familiar terms -- at least to someone knowledgeable in a that specific domain.

Taking the step of capturing domain knowledge in a new domain-specific language is a big step, though. There are a variety of reasons to defer taking that step or, perhaps, to not take that step at all.  Sometimes an entire language isn't required to implement the desired user interface. Sometimes it's desirable to have some benefits of a general-purpose language without the overhead of designing an entirely new all-in-one domain-specific and general-purpose language. The embedded domain-specific language is one approach that has been used to bring some benefits of a domain-specific language into an existing general-purpose programming language. The general approach is to use existing general-purpose language constructs, such as pre-processor macros and operator overloading, to build constructs with a domain-specific language feel within an existing language.

Within the set of embedded domain-specific languages that I'm aware of, I'm actually aware of three key styles of embedded a domain-specific language inside an existing general-purpose programming language.

Decorations and Annotations
One of the simplest domain-specific language integration techniques that I'm aware of is the decorator/annotation pattern. This style of domain-specific language is used to statically register classes or functions with a library framework.
class slave_address_map_info extends uvm_object;
  protected int min_addr;
  protected int max_addr;
  function new(string name = "slave_address_map_info");
    super.new(name);
  endfunction
  `uvm_object_utils_begin(slave_address_map_info)
    `uvm_field_int(min_addr, UVM_DEFAULT)
    `uvm_field_int(max_addr, UVM_DEFAULT)
  `uvm_object_utils_end

  // ...
endclass

While there are many examples of a decorator/annotation eDSLs, the example that came to mind first for me was the Universal Verification Methodology (UVM). UVM is a class library for functional verification built on top of the SystemVerilog domain-specific language. Two common operations that users of the UVM need to perform is registration of key user-defined types with the class library, and writing functions to clone, compare, and print class instances. Performing these operations in plain old code is time-consuming and error-prone. UVM provides a set of macros that allow the user to declare the existence of their user-defined class type and the fields within it (shown above highlighted in blue). 
The macros (SystemVerilog's key feature supporting embedded domain-specific languages) above cause the class type to be registered with the UVM class library, and implement functions for comparing, displaying, and cloning an object of this type. All from a high-level specification.


Enmeshed eDSL
Our next level of eDSL integration starts to look a bit more like a language. An Enmeshed eDSL provides the user statements that look a bit like a programming language, but are really driving algorithms behind the scenes. I call this style of integration Enmeshed because the user's general-purpose programming language code interacts closely with the algorithms driven by the eDSL as program runs.
class item : public rand_obj {
public:
item(rand_obj* parent = 0) : rand_obj(parent), src_addr(this), dest_addr(this) {
src_addr.addRange(0, 9);
src_addr.addRange(90, 99);
constraint(dest_addr() % 4 == 0);
constraint(dest_addr() <= reference(src_addr) + 3); 

}
   
randv<uint> src_addr;
randv<uint> dest_addr;
};
Our example of an Enmeshed eDSL comes courtesy of CRAVE, a constrained-random data generation package for the C++-based SystemC library. As you can see, the highlighted sections above look a bit more like a language. In this case, these are constraint expressions that control a constraint solver such that the values of src_addr and dst_addr obey the relationships established by the expressions.
When the user's program runs, it creates instances of classes like the one shown above, calls an API to create new random values for the random fields, and uses the values from those fields directly. In short, I consider the eDSL enmeshed with the host language because execution of the host language is interleaved with (effective) execution of the eDSL. The host language takes a primary role, and calls the eDSL code to provide specific services to the primary application.

Encapsulated eDSL
Our final level of eDSL integration is an embedded DSL that defines a new domain within the host language. There are several hardware-description languages embedded in general-purpose programming languages that fit this definition.

import chisel3._

class GCD extends Module {
  val io = IO(new Bundle {
    val a  = Input(UInt(32.W))
    val b  = Input(UInt(32.W))
    val e  = Input(Bool())
    val z  = Output(UInt(32.W))
    val v  = Output(Bool())
  })
  val x = Reg(UInt(32.W))
  val y = Reg(UInt(32.W))
  when (x > y)   { x := x -% y }
  .otherwise     { y := y -% x }
  when (io.e) { x := io.a; y := io.b }
  io.z := x
  io.v := y === 0.U
}

I've selected CHISEL (Constructing Hardware in a Scala-Embedded Language) as the example. What makes an encapsulated eDSL different is that the description made using the eDSL is monolithic and executed to create a single model -- in this case, Verilog. The GCD design show above might be used within a larger CHISEL-based design, but would never be used within a user's program to provide a useful service to the program. In a sense, an encapsulated eDSL description takes on a primary role within the host application. 


Embedding a DSL in Python
As we've seen, an embedded domain-specific language can provide a domain-specific interface to complex algorithms inside the confines of an existing general-purpose programming language. We've looked at several styles in which an embedded domain-specific language can be integrated into its host language -- all with different tradeoffs in terms of benefits and usability.
I've personally worked with embedded domain-specific languages in nearly every programming language I've used -- from C/C++ to TCL to Java. Most recently, though, I've been learning Python and (naturally) exploring the capabilities that Python offers for supporting an eDSL. Over the next few posts I'll look at Python's features that enable eDSL integration using a small eDSL I've been working on as an example.
In the meantime, what has your experience been with embedded domain-specific languages? Helpful or frustrating? Any notable examples -- either good or bad?


Disclaimer
The views and opinions expressed above are solely those of the author and do not represent those of my employer or any other party.

Saturday, July 13, 2019

The Toolmaker's Dilemma: Visionaries Have Always Created Their Own Tools


I recently saw a quote (on Twitter, in a photo no less) to roughly the same effect as the title above: that innovators and visionaries have always created their own tools. I'd attribute the quote if I could, but the dynamic nature of Twitter has ensured that my chances of locating the original post are slim to none. Nonetheless, I've been thinking quite a bit about the concept over the last few weeks. First, whether the claim is true. Secondly, if true, whether this is a good, bad, or neutral thing. And thirdly, what, if anything, could or should be done to change the situation.

Who Are the Visionaries?


One of my favorite Geoffrey Moore books is Crossing the Chasm, which I've read this multiple times over the course of my career. Despite some of the example in the book being a bit dated, much of the advice is still relevant and I feel that I come away with new insights every time I read the book.

Moore identifies Visionaries as the Early Adopters in his book.
Visionaries are that rare breed of people who have the insight to match an emerging technology to a strategic opportunity, the temperament to translate that insight into a high-visibility, high-risk project, and the charisma to get the rest of their organization to buy into that project. 
Visionaries drive the high-tech industry because they see the potential for an "order-of-magnitude" return on investment and willingly take high risks to pursue that goal. 
Moore sees Visionaries as seeking monetary return on investment, and I've encountered many of these. However, I've also encountered Visionaries that are looking for different types of return on investment -- for example, fundamentally altering the way an industry approaches functional verification methodology.

The Opportunities and Challenges of Visionaries

Engaging with Visionaries, as with all of the personalities across the technology adoption curve, has its opportunities and challenges. Visionaries have a clear and ambition vision of the future, and are highly motivated to realize that vision. On the flip side, Visionaries make for demanding customers. Quoting Moore:
As a buying group, Visionaries are easy to sell to but very hard to please. This is because they are buying a dream -- which, to some degree will always be a dream.
Visionaries are also, by definition, out of step with the majority and early majority portions of the market where you hope to get your tool adopted, and often 5-10 years ahead. This can be a good thing if you buy into their vision of the future. However, it's often unclear whether their ideas are crazy good or just crazy.

Moore advises an approach of partnership with Visionaries. This can be a good approach for truly early stage technologies, provided the Visionary is backed by an organization with deep pockets (either financial or people resources), and provided that you buy into their vision of the future. When these criteria are not met, it's very likely a "business decision" will be made to not engage with the Visionary since engagement won't help the product get to its intended destination.


Why do Visionaries Build their Own Tools?

The decision to not engage with a Visionary is typically done for good and rational reasons. After all, the market is optimized to target the majority -- and this is true both for commercial and non-commercial endeavors. However, the story often doesn't end here. Remember, Visionaries are highly-motivated people and driven to realize their view of the future.

A not-infrequent result is that Visionaries collect pieces of available technology and proceed to implement a version of the tool of their dreams. So, the short answer is that Visionaries build their own tools because they feel they haven't any viable alternatives.


What's Wrong with this Picture?

So, is this really a problem, or just the way technology needs to evolve? After all, the best way to determine whether an idea is crazy-good or just crazy is to wait and see if it gains traction or withers away. Just like biological evolution, this makes sense in large ecosystems. Losing a few crazy-good ideas along with the plain crazy ideas in a large ecosystem is just a cost of doing business.

However, many of us find ourselves, by choice or circumstance, in much smaller niche ecosystems. Here, fostering innovation is key to growing the ecosystem. Losing a few crazy-good ideas makes a big difference here. And, the fact that Visionaries are off building out their visions on the fringes of the ecosystem has the effect of further subdividing an already-small ecosystem.

A Venture Capital Approach to Visionaries

If you find yourself in a niche ecosystem -- whether commercial or open source -- I would encourage you to take a venture capital approach to supporting the work of Visionaries. What do I mean by this? Make some bets to enable the work of Visionaries in the tool you provide to the market, and provide ways for Visionaries to interact with your tool's community. Much like the investments venture capital makes, the assumption is that most of these bets won't pay off, but that a few will pay off in a big way.

One big thing that has changed since Geoffrey Moore wrote Crossing the Chasm in 1991 is just how easy it is for communities (even niche ones) to connect and interact. This provides fundamental new opportunities when it comes to propagating new technology to technology ecosystems, and merits a rethink in the way we approach the relationship between new technology and visionaries.

In some sense, the suggestion above changes relatively little about the way we build and promote tools. We often accidentally build in capabilities that visionaries can use. However, I believe we can get even better results by deliberately and intentionally creating these visionary-friendly mechanisms. Plan and develop extension mechanisms that don't impact usability for mainstream users, but allow visionaries to implement their visions in the context of your tool instead of needing to create a completely-separate tool. Keep visionaries close to your community of existing users so they have a ready audience to help accelerate the process of identifying crazy-good ideas and weeding out plain-crazy ideas. Be on the lookout for those truly crazy-good ideas that resonate with your community and have potential to be the next big thing.


Disclaimer
The views and opinions expressed above are solely those of the author and do not represent those of my employer or any other party.


Sunday, June 16, 2019

Py-HPI: Applying Python for Verification


Intro
In my last post, I talked about a prototype procedural interface between Python and HDL that enables cross-calling between Python and SystemVerilog. My primary motivation for investigating a procedural interface was its potential to maximize performance. In this post, I create a Python testbench for a small IP and compare it to the equivalent C++ testbench. I also look at the performance of Python for verification.

Creating a Python Testbench
My go-to IP for trying out new verification techniques is a small 32-bit RISC-V core named Featherweight RISC (FWRISC) that I created for a design contest last year. The original testbench was written in C++, so that will be my baseline for comparison. If you're interested in the structure of the testbench, have a look at this post.

Since I was keeping the testbench structure the same, I didn't expect much in terms of a reduction in lines of code. C++ is a bit verbose, in that it expects a header and implementation file for each class. This contributes to the fact that each C++ test is roughly twice as long as each Python test:

  • C++ Test: 328 lines
  • Python Test: 139 lines
Reducing the lines of code is a good thing, since more code statistically means more bugs, and spending time finding and fixing testbench bugs doesn't help us get our design verified. But, that's just the start.

The unit tests for FWRISC are all self-checking. This means that each assembly file contains the expected value for registers modified by the test. You can see the data embedded below between the start_expected and end_expected labels.


entry:
li x1, 5
add x3, x1, 6
j done
// Expected value for registers
start_expected:
.word 1, 5
.word 3, 11
end_expected:

Because I didn't want to need to install an ELF-reading library on every machine where I wanted to run the FWRISC regression, I wrote my own small ELF-reading classes for the FWRISC testbench. This amounted to ~400 lines of code, and required a certain amount of thought and effort.

When I started writing the Python testbench, I thought about writing another ELF-reader in Python based on the code I'd written in C++... But then I realized that there was already a Python library for doing this called pyelftools. All I needed to do was get it installed in my environment (more on that in a future post), and call the API:

with open(sw_image, "rb") as f:
elffile = ELFFile(f)
symtab = elffile.get_section_by_name('.symtab')
start_expected = symtab.get_symbol_by_name("start_expected")[0]["st_value"]
end_expected = symtab.get_symbol_by_name("end_expected")[0]["st_value"]
section = None
for i in range(elffile.num_sections()):
shdr = elffile._get_section_header(i)
if (start_expected >= shdr['sh_addr']) and (end_expected <= (shdr['sh_addr'] + shdr['sh_size'])):
start_expected -= shdr['sh_addr']
end_expected -= shdr['sh_addr']
section = elffile.get_section(i)
break
data = section.data()

That's a pretty significant savings both in terms of code, and in terms of development and debug effort! So, definitely my Python testbench is looking pretty good in terms of productivity. But, what about performance?

Evaluating Performance
Testbench performance may not be the most important factor when evaluating a language for use in verification. In general, the time an engineer takes to develop, debug, and maintain a verification environment is far more expensive than the compute time taken to execute tests. That said, understanding that performance characteristics of any language enables us to make smarter tradeoffs in how we use the language. 


I was fortunate enough to see David Patterson deliver his keynote A New Golden Age for Computer Architecture around a year ago at DAC 2018. The slide above comes from that presentation, and compares the performance of a variety of implementations of the computationally-intensive matrix multiply operation. As you can see from the slide, a C implementation is 50x faster than a Python implementation. Based on this slide and the anecdotal evidence of others, my pre-existing expectations were somewhat low when it came to Python performance. But, of course, having concrete data specific to functional verification is far more useful than a few anecdotes and rumors.

Spoiler alert: C++ is definitively faster than Python.

As with most languages, there are two aspects of performance to consider with Python: startup time and steady-state performance. Most of the FWRISC tests are quite short -- in fact, the suite of unit tests contains tests that execute less than 10 instructions.This gives us a good way to evaluate the startup overhead of Python. In order to evaluate the steady-state performance, I created a program that ran a tight loop with 10,000,000 instructions. The performance numbers below all come from Verilator-based simulations.

Startup Overhead
As I noted above, I evaluated the startup overhead of Python using the unit test suite. This suite contains 66 very short tests. 

  • C++ Testbench: 7s
  • Python Testbench: 18s
Based on the numbers above, Python does impose a noticeable overhead on the test suite -- it takes ~2.5x longer to run the suite with Python vs C++. That said, 18 seconds is still very reasonable to run a suite of smoke tests.

Steady-State Overhead
To evaluate the steady-state overhead of a Python testbench, I ran a long-loop test that ran a total of 10,000,000 instructions.

  • C++ Testbench: 11.6s
  • Python Testbench: 109.7s
Okay, this doesn't look so good. Our C++ testbench is 9.45x faster than our Python testbench. What do we do about this?

Adapting to Python's Performance
Initially, the FWRISC testbench didn't worry much about interaction between the design and testbench. The fwrisc_tracer BFM called the testbench on each executed instruction, register write, and memory access. This was, of course, simple. But, was it really necessary?

Actually, in most cases, the testbench only needs to be aware of the results of a simulation, or key events across the simulation. Given the cost of calling Python, I made a few optimizations to the frequency of events sent to the testbench:

  • Maintain the register state in the tracer BFM, instead of calling the testbench every time a write occurs. The testbench can read back the register state at the end of the test as needed.
  • Notify the testbench when a long-jump or jump-link instruction occurs, instead of on every instruction. This allows the testbench to detect end-of-test conditions and minimizes the frequency of calls
With these two enhancements to both the C++ and Python testbenches, I re-ran the long-loop test and got new results:

  • C++ Testbench: 4s
  • Python Testbench: 5s
Notice that the C++ results have improved as well. My interpretation of these results is that most of the time is now spent by Verilator in simulating the design, and the results are more-or-less identical.

Conclusions
The Python ecosystem brings definite benefits when applying Python for functional verification. The existing ecosystem of available libraries, and the infrastructure to easily access them, simplifies the effort needed to reuse existing code. It also minimizes the burden placed on users that want to try out an open source project that uses Python for verification.

Using Python does come with performance overhead. This means that it's more important to consider how the execution of the testbench relates to execution of the design. A testbench that interacts with the design frequently (eg every clock) will impose much greater overhead compared to a testbench that interacts with the design every 100 or 1000 cycles. There are typically many optimization opportunities that minimize the performance overhead of a Python testbench, while not adversely impacting verification results.

It's important to remember that engineer time is much more expensive than compute time, so making engineers more productive wins every time. So, from my perspective, the real question isn't whether C++ is faster than Python. The real questions are whether Python is sufficiently fast to be useful, and whether there are reasonable approaches to dealing with the performance bottlenecks. Based on my experience, the answer is a resounding Yes. 

Disclaimer
The views and opinions expressed above are solely those of the author and do not represent those of my employer or any other party.

Saturday, June 8, 2019

Py-HPI: A Procedural HDL/Python Integration


As I mentioned in my last post, I've been looking at using Python for more tasks, including functional verification. My go-to languages for functional verification have traditionally been SystemVerilog for professional work, and C++ when I'm working on a personal project. I've started doing more of my small-application development in Python (often as an alternative to C++), and have wondered whether I could also migrate my testbench development from C++ to Python as well.

This blog post provides an introduction to an integration I created between Python and an hardware descriptin language (HDL) simulation environment called Py-HPI (for Python HDL Procedural Interface). I'm far from the first to create an integration between Python and an HDL simulator (I'm aware of at least one formal project, and several others users that have written about their integration work), so what is different about Py-HPI?

Well, two things, really in my opinion: 
  • Py-HPI integrates at the procedural level, which means Python can directly call tasks in the HDL environment instead of interacting with signals in the HDL environment. 
  • Py-HPI provides a high degree of automation for setting up this procedural-level integration.
In this blog post, I will be describing the user experience in using Py-HPI. In future blog posts, I'll walk through how Py-HPI integrates on my go-to project for playing with verification technologies, and I'll go more in-depth on how Bus Functional Models (BFMs) and testbench environments are developed for Py-HPI.

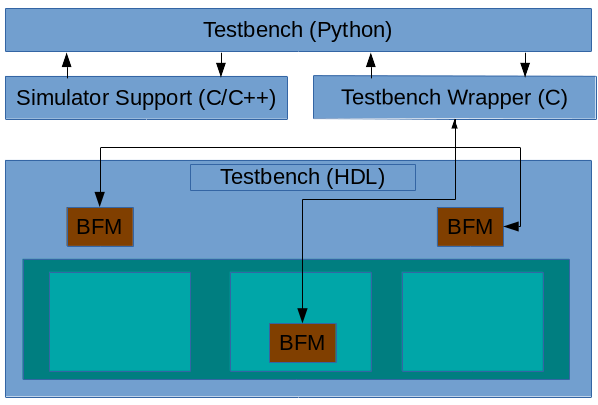
Py-HPI: The Big Picture


The structure of a Py-HPI enabled testbench is shown above. The key elements are described below
  • Testbench (Python) -- This is Python code the user writes to interact with the design running within the HDL simulation environment
  • Simulator Support -- This is C/C++ code generated by Py-HPI that implements the integration with a specific type of simulator. In general, this code is independent of the specific testbench
  • Testbench Wrapper -- This is C code generated by Py-HPI that implements the testbench specifics of the integration between Python and the HDL environment
  • Bus Functional Models (BFMs) -- BFMs written in HDL (eg SystemVerilog) implement the translation between task calls and signal activity and vice versa.
Currently, Py-HPI supports standard SystemVerilog-DPI simulators (eg Modelsim) as well as Verilator. More integrations are planned, including support for Verilog simulators like Icarus Verilog.

Py-HPI: A Small Example


One easy way to get a sense for the user experience when using Py-HPI is to walk through the steps to run a very simple testbench environment. One of the Py-HPI examples provides just such a testbench.
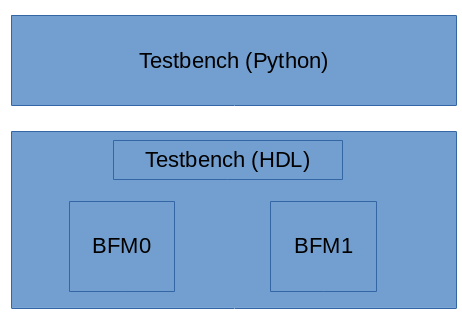
The structure of this testbench environment is shown above. The Python portion of the testbench drives the SystemVerilog HDL testbench via two bus functional models that are instanced in the SystemVerilog environment.

Python Testbench

First, let's take a look at the Python testbench code, which you can find here:
def thread_func_1():
  print("thread_func_1")
  my_bfm = hpi.rgy.bfm_list[0]
  for i in range(1000):
    my_bfm.xfer(i*2)

def thread_func_2():
  print("thread_func_2")
  my_bfm = hpi.rgy.bfm_list[1]
  for i in range(1000):
    my_bfm.xfer(i)

@hpi.entry
def run_my_tb():
    print("run_my_tb - bfms: " + str(len(hpi.rgy.bfm_list)))

    with hpi.fork() as f:
      f.task(lambda: thread_func_1());
      f.task(lambda: thread_func_2());

    print("end of run_my_tb");
Execution starts in the run_my_tb()method (which is marked by a special Python decorator hpi.entry, to identify it as a valid entry point) which starts two threads and waits for them to complete. Each of the thread methods (thread_func_1 and thread_func_2) obtain a handle to one of the BFM instances and call the BFM's API to perform data transfers in the SystemVerilog testbench environment.
In a way, it's almost identical to what I would write in either C++ or SystemVerilog. In a way, that's kind of the point from my perspective.

Running the Testbench

Okay, now that we know what the Python side of the testbench looks like, let's see the commands used to create and compile the files necessary to run a simulation. These commands are in the runit_vl.sh script inside the example directory. In this case, I'll show the commands required to run Py-HPI with the Verilator simulator. The example also provides a script (runit_ms.vl) that runs the same example with Modelsim.

Create the Simulation Support Files

We first need to create the simulation-support files. Since we're targeting the Verilator simulator, we need to run the 'gen-launcher-vl' subcommand implemented by the Py-HPI library.
python3 -m hpi gen-launcher-vl top -clk clk=1ns
Verilator is a bit of an outlier, in that the simulation-support files are specific to the HDL design being simulated. Consequently, we need to specify the name of the top Verilog module and the clock name and period.

Create the Testbench Wrapper

Now, we need to create the Testbench wrapper file that will support the specific BFMs instantiated inside the testbench. 
python3 -m hpi -m my_tb gen-bfm-wrapper simple_bfm -type sv-dpi
python3 -m hpi -m my_tb gen-dpi

Because the Verilator simulator supports DPI, we generate a DPI-based testbench wrapper for our testbench that uses a single BFM. The resulting testbench wrapper is implemented in C and provides the connection between SystemVerilog and Python for our BFM.

Compile Everything

This step is very specific to the simulator being used. 
# Query required compilation/linker flags from Python
CFLAGS="${CFLAGS} `python3-config --cflags`"
LDFLAGS="${LDFLAGS} `python3-config --ldflags`"

verilator --cc --exe -Wno-fatal --trace \
 top.sv simple_bfm.sv \
 launcher_vl.cpp pyhpi_dpi.c \
 -CFLAGS "${CFLAGS}" -LDFLAGS "${LDFLAGS}"

make -C obj_dir -f Vtop.mk
Since we're using Verilator, we need to run Verilator to compile the HDL files and the simulator-support and testbench wrapper C/C++ files. Verilator generates C++ source and a Makefile to build the final simulator image. Our last step is to build the Verilator simulation image using the Verilator-created Makefile.

Run it!

Finally, we can run our simulation.
./obj_dir/Vtop +hpi.load=my_tb +vl.timeout=1ms +vl.trace
We pass a few additional plusargs to enable specific behavior:

  • The +hpi.load=my_tb specifies the Python module to load
  • The +vl.timeout=1ms specifies that the simulation should run for a maximum of 1ms. Other simulators will, of course, provide different mechanisms for doing this
  • The +vl.trace argument specifies that waveforms should be created. Other simulators will provide different ways of turning on tracing.
So, all in all, Py-HPI makes it quite easy to connect a Python testbench to an HDL simulator at the procedural level.

Conclusion

In this blog post, I introduced Py-HPI, a procedural interface between Python and an HDL testbench environment along with an overview of the user experience when creating and running a testbench with Py-HPI. In my next post, I'll look at a Py-HPI testbench for my FWRISC RISC-V core and compare the new Python testbench with the existing C++ testbench. Until then, feel free to check out the Py-HPI library on GitHub (https://github.com/fvutils/py-hpi) and I'd be interested to hear your experiences in using Python for functional verification.


Disclaimer
The views and opinions expressed above are solely those of the author and do not represent those of my employer or any other party.


Sunday, June 2, 2019

Functional Verification and the Ecosystem Argument

I've been involved in the functional verification space for quite some time -- both personally and professionally. On the personal side, I've recently been experimenting with using Python as a functional verification language. The simplest reason? The ecosystem.

The Ecosystem Argument
I've been involved in many discussions over the years that bring up The Ecosystem Argument. It goes something like this: If we use programming language X for Y (a plug-in language, a tool extension language, an implementation language, etc), we'll benefit from the ecosystem around language X. An ecosystem is a very powerful thing, and encompasses the language tools (editors, compilers, linting tools), the users that know a given language, and the available libraries for the language. So, the argument isn't entirely out of line. Using a popular language rather than an obscure language is often not a bad thing. That said, there's a hole in the generic form of The Ecosystem Argument: a programming language is used for many purposes, and much of the specialized knowledge is domain-specific and not language-specific. To put it another way, just because I know Python doesn't mean that I'm a Machine Learning guru -- despite the fact that Python is heavily used in this space.

All of these elements of a language ecosystem are important to consider. However, depending on the circumstances, some of these factors take on greater importance than others. If users will be using the language to create larger applications, the popularity of the language and availability of relevant libraries may take on increasing importance. If users will be using a domain-specific library (eg SystemC for modeling hardware with C++), the language may be less important than the semantics of the underlying domain because users will be more focused on expressing the semantics supported by the library than the semantics supported by the programming language.  

Libraries and Availability
In my experience, it's not a good assumption that selecting a particular programming language will bring a new group of users into a specific domain. It's possible, but not probable. What's more important is whether a group of users can easily be productive given the ecosystem around a given language.

A key aspect of language ecosystem and productivity is library availability. Libraries are present in all language ecosystems. In some cases (eg Java), the language specifies a rich library that satisfies the requirements of many users. In all cases, there are external libraries that serve more specialized needs. 

Getting access to these external libraries poses another challenge, and it's well worth noting any language whose ecosystem simplifies the process of acquiring and publishing libraries. If we're using C/C++ or Java, there are several steps we need to go through to acquire a new library:
  • Locate the project
  • Determine whether the project requires other libraries, and go find those
  • Determine where to install the library, and how our software will get access to it (eg co-locate it with our project, modify the library path, etc)
This model is pretty workable if we are building an large-scale application or library. The overhead of setting up libraries is typically low compared to the value provided by the application or library. This model becomes much more challenging when we're developing smaller pieces of functionality. In these cases, the overhead of acquiring and setting up the external library may equal or exceed the utility we get from the library. In these situations, it quickly starts to appear less expensive to just build something small that serves our needs rather than try to use an external library.

These situations come up all the time in functional verification. Here's just one example. One of the projects I worked on is a small RISC-V core. My testbench needed to get symbol information from the test files that the core executes as part of the test suite. Ideally, I could have used something like libelf or its successor elftools. However, that would require anyone that wanted to run the test suite for my core to also get and install this library. To avoid adding complication, I simply wrote my own simple ELF-file reader that could be included in the testbench.

Python and other languages address this lost opportunity for reuse by providing mechanisms to easily publish and acquire external libraries. Python has PyPi, the Python Package Index. Javascript has NPM. And, at least with Python, users don't need to have administrator privileges in order to install packages for their own use. 

In a functional verification environment, there are many other more-specialized cases where reuse is desired. The case described above is more generic, since many software projects have reasons to inspect ELF files. What about Bus Functional Models (BFMs)? What about specialized protocol generators? The possibility of being able to easily share and reuse some of these elements by leveraging Python's existing ecosystem is exciting!
 

Looking Forward
In my next few blogs, I plan to expand on how I'm using Python for functional verification and the benefits (and challenges) that I've experienced. So, stay tuned!


Disclaimer
The views and opinions expressed above are solely those of the author and do not represent those of my employer or any other party.


Saturday, March 2, 2019

Generate Custom Content Quickly with a Template Engine


I was at DVCon earlier this week, and attended the UVM Update Tutorial delivered by Cliff Cummings. Cliff described his typical process of creating UVM elements, which is to have a set of 'golden' template files that can be copied and hand-customized to the task at hand. It's certainly something I've done frequently on UVM projects and in many other contexts as well.

If you work in verification and you're anything like me, you create lots of files pretty much every day. Scripts, UVM code, C++ code, Makefiles, meta-data files, the list goes on and on. While all of these files will contain custom content, there is often a lot of boilerplate content as well. There are certainly specialized tools focused on quickly creating content for specific domains. For example, there are several tools and libraries to help quickly create UVM elements based on some high-level inputs from the user. But, what about files that are custom to your environment? Can we do better than the standard process of copy, rename, and then manually doing a search/replace in each file?

VTE
I've recently been playing with just such a template engine for my own use. For lack of a better name, I've been calling it the Verification Template Engine (VTE), since I'm largely using it for creating files in the context of a verification environment. VTE is implemented in Python and leverages the Jinja2 template engine, which is typically used for creating web content from a template.

Given how much VTE is just reusing existing functionality, what is the value-add? Two things, really:

  • VTE provides a user interface that makes it easy to see what templates are available in the environment
  • VTE specifies a template structure that makes it really easy to create new templates from those 'golden' template files that you would normally copy, rename, and modify.

Using Templates
VTE currently ships a couple of small templates with the tool. Your custom templates will be found via the VTE_TEMPLATE_PATH environment variable.

VTE currently supports two commands: list and generate. The list command shows the set of templates that were found on the template path.

% vte list
project.ivpm.googletest-hdl - IVPM project with Googletest-HDL dependence
verif.ip.googletest-hdl     - IP verification environment using Googletest-HDL
verif.uvm.test              - Creates a UVM test class
The generate command, as you might expect, generates content from a specified template. 

usage: vte generate [-h] [-force] template name [KEY=VALUE [KEY=VALUE ...]]

positional arguments:
  template    ID of template
  name        Name to use in the template
  KEY=VALUE   Specify other template variables

optional arguments:
  -h, --help  show this help message and exit
  -force      force overwrite of existing files

Here's an example using VTE to create the skeleton project structure that I use when developing an IP:

% vte generate project.ivpm.googletest-hdl my_proj
Note: processing template etc/ivpm.info
Note: processing template etc/packages.mf
Note: processing template etc/env.sh
Note: processing template scripts/ivpm.py
Note: processing template scripts/ivpm.mk
% find -type f
./etc/ivpm.info
./etc/packages.mf
./etc/my_proj_env.sh
./scripts/ivpm.py
./scripts/ivpm.mk
Creating Templates

Creating new template is simple as well. VTE. uses a marker file, named .vte to identify the root directory of a template. Any files in that directory or its subdirectories is considered to be a template file. The ID for a template is composed from the path elements between the VTE_TEMPLATE_PATH entry and the directory containing the .vte marker file.

For a very simple template, all you need is an empty .vte marker. However, adding a little information to the .vte file makes your template more useful. For example, you can add a short description for your template, which will be shown with the vte list command is run:

[template]
desc = Creates a UVM test class

The template files, themselves, use Jinja2 markup to refer to template parameters and specify directives.

/****************************************************************************
 * {{name}}.svh
 * 
 ****************************************************************************/
{%set filename = "{{name}}.svh" %}
/**
 * Class: {{name}}
 * TODO: Document UVM Test {{name}}
 */
class {{name}} extends {{base_class}};
 `uvm_component_utils({{name}})
 
 function new(string name, uvm_component parent=null);
  super.new(name, parent);
 endfunction
 
endclass

The example above is a template for a UVM Test class. The {% set filename ... %} directive specifies the name of the output file, which depends on the value of the name parameter. The rest of the template contains a reference to the name parameter wherever we want that to be substituted in. As you can probably guess, these locations where {{name}} is referenced are the very locations that you'd go through with a text editor and manually substitute in some content.


Sound Interesting?
If this all sounds interesting, check out VTE on GitHub: https://github.com/fvutils/vte. You can download a release tarball from the Releases area, add the bin directory to your PATH, and try it out right away. You can also find documentation in the README file.
If you find an issue with VTE, or would like to see it support a new feature, file a ticket on the GitHub issue tracker. Even better, send me a pull request!

My hope is that a tool like VTE can make creating boilerplate code much simpler and faster, allowing you to focus your efforts on adding truly-unique content. That is, after all, always the goal of engineering and automation, right?


Sunday, January 13, 2019

EDAPack: Simplifying Development-Tool Management


One of my first "real" engineering courses during my college days centered around scripting and working with Unix, and the professor really emphasized that any repetitive task was a candidate for automation. It's a point that resonated with me at the time, and I continue to question whether any mind-numbing and multi-step process I face should be automated.

Challenges of Managing EDA Tools
One of those mind-numbing processes I've been facing recently is managing my installations of development tools -- specifically, the electronic design automation (EDA) tools that I use to simulate and synthesize Verilog hardware descriptions and develop the embedded software that runs on those devices.
In my experience, EDA tools are a bit different than the standard software that might be installed by default on your Linux workstation:
  • EDA software is enough of a niche market that builds will either just not be available for your Linux distribution, or will be an older version of the software.
  • I often need to install EDA software on machines where I don't have root access, so it wouldn't help me much if the Linux distribution provided a pre-built version of the software
  • I often don't have control over the Linux distribution and version that I have to use. CentOS/RHEL 6, released in 2011, is still quite common and will likely continue to be common since support is offered through 2020.
  • It's often necessary to have several versions of EDA software installed at a given time. Projects often have a dependency on a specific version -- at least until a newer version is validated, so multiple versions must coexist
These challenges, in and of themselves, make maintaining a collection of EDA tools time-consuming.

Challenges of Managing OSS EDA Tools
When it comes to working with open-source EDA tools, there is another level of complexity. These tools are often provided in source form, so they must be installed by the end user. EDA software, like any other, can be complex and can have dependencies on additional software packages. Compiling SymbiYosys, the open-source formal-analysis tool, requires that the source for seven other packages be fetched, compiled, and installed. This is complex enough when the user has administrator access to the machine and can install needed development libraries. Without administrator access, this process becomes incredibly complex. And, of course, when a new version of one of the packages is released, the whole process must be repeated.

Introducing EDAPack
I created EDAPack, which I consider to be in an Alpha state, to address the challenges I describe above. You can think of EDAPack has having two main components, as shown in the diagram below:


First off is the base set of tools, shown in the bottom box. EDAPack contains an installation of Environment Modules, which is a software package that is somewhat-widely used to manage configuring the environment for different software tools. Modules makes it easy to configure the environment with the right mix of tool versions with a minimum of fuss. EDAPack also contains an installation of Python3, a software package that is increasingly required to run open-source software tools, but is somewhat difficult to get correctly-installed on older Linux distributions. Finally, EDAPack contains scripts to manage installation of tools into the EDAPack tree.

The second part of EDAPack is most significant for those of you that are using open-source tools, such as a GCC cross-compiler or one of the open-source Verilog simulators. A key aspect of EDAPack's mission is to provide pre-compiled versions of these packages that can simply be installed and used, skipping all the complexities of installing development libraries and compiling required dependencies. Right now, just a few packages are setup to be used in this way, but the goal is to expand that set based on user demand.

Now, providing pre-compiled software is always an interesting proposition in a Linux environment. Different distributions provide different versions of tool and libraries, making it difficult to deliver software that will run on a variety of distributions. EDAPack compiles packages on CentOS 6, then tests the software on a variety of Linux distributions (courtesy of Docker), ensuring that the software will run correctly on a wide variety of Linux distributions.

How does it Work?
Getting started is actually pretty simple (and that's by design): just download EDAPack from the GitHub release page. After installing EDAPack, you'll want to source a setup script in the EDAPack 'etc' directory (<edapack>/etc/edapack.sh) in order to configure some initial paths.

From there, you'll probably want to install some software. This can be done using the edapack avail command to list software that is available to install:


Once you know which software you'd like to install, the edapack install command is used to  fetch and install the software into the EDAPack tree. For example, edapack install verilator fetches a pre-built version of Verilator from the release area on GitHub and installs it into the EDAPack tree.

Before using software from the EDAPack tree, you will use the module tool (provided by Environment Modules) to list the installed packages and load tools into your environment. Here's the output from module avail, which lists the installed tools. 

We can see that symbiyosys and verilator are installed. We can load a specific version of these tools, or specify the 'latest' version to get the newest installed version.

In other words, simply issuing the command module load verilator/latest will setup our environment to use the latest-installed version of Verilator.

Current Status and Call to Action

Currently, EDAPack is newly-released, provides a bare minimum of packages (Verilator, Icarus Verilog, and SymbiYosys), and provides support for Linux only. EDAPack is useful to me, and I'll continue to evolve it to meet my needs. However, I'm very interested in whether EDAPack could be useful to you as well.

Are you an EDA user? What tools would you like to see delivered in this way? What OS (Linux distro or other) do you use, and would like to ensure is supported?

Are you an author of open-source engineering software? Would you like to have your software made available to users in this way?

Do you have other ideas of what might be possible with a framework like this?

EDAPack is designed to enable hardware and embedded-software developers focus on developing their designs, not on compiling their development tools. I'm interested in your input on whether you feel EDAPack is a useful concept and, if so, what could make it even more useful to you. Feel free to comment on the blog, or file requests on GitHub. What tools are in your pack?