Showing posts with label Altera. Show all posts

Sunday, July 17, 2022

PyUCIS: Manipulating Coverage Data


In a prior post, we looked at how to inspect coverage as a text report and export coverage data using the PyVSC API, and view coverage graphically using the PyUCIS-Viewer. Recent enhancements have enabled the PyUCIS library to provide even more ways to manipulate coverage data. Over the next couple of posts, we’ll look at those enhancements. 

New ‘ucis’ Command

PyUCIS is a library for working with the Accellera UCIS data model. It started as a library for other applications and libraries, such as PyVSC and the PyUCIS Viewer, to use to read and write data using the UCIS data model. Recent enhancements have added standalone functionality which can meaningfully be accessed from the command line. 

You can find documentation for the ucis command and sub-commands in the PyUCIS documentation. Fundamentally, there are four key operations:

  • Convert coverage data from one format to another
  • Merge coverage data from multiple databases into a single database
  • Produce coverage reports in various formats
  • Obtain information about available coverage data and report formats

These commands are just a starting point. They will be enhanced over time, and more commands may be added as well. If you have suggestions for new commands and/or new capabilities for existing commands, feel free to add an enhancement request on the PyUCIS GitHub page.

Plug-in Framework

PyUCIS has added a plug-in framework with support for database formats and report formats. The goal is to make commands operating on coverage data extensible extensible from the beginning, as well as to enable the set of supported coverage-data formats and report formats to be easily extended without changing PyUCIS.  I’ll devote a future post to the plug-in framework. For now, the ucis command supports listing the available coverage-data and report plug-ins. For example:

% ucis list-db-formats

libucis - Reads coverage data via an implementation of the UCIS C API

xml     - Supports reading and writing UCIS XML interchange

yaml    - Reads coverage data from a YAML file


New Input Format

One often-requested PyUCIS feature is the ability to merge coverage data from several input coverage databases into a single resulting coverage database. One of the first challenges I faced in implementing this functionality was how to write tests. The UCIS API is written with applications in mind. I’ve found it to be a pretty-verbose API when it comes to writing tests. Consequently, tests written directly in terms of the API aren’t particularly easy to follow from a code perspective.

I decided to define a YAML format to make it simpler to capture coverage data in an easy-to -read way. Initially, this was just for testing. However, it may also be a useful interchange format that is less verbose and complex (also, quite possibly, more simplistic) that the XML interchange format defined by the UCIS standard.


A simple coverage specification is shown above. This coverage data describes a covergroup type (my_cvg) with a single instance (i1). A single coverpoint (cp1) has two bins (b1, b2) of which one has a single hit and one has no hits. While this coverage specification was created to make setting of test coverage data simpler for a human, I believe it may also be useful as a simple coverage-interchange format. If you find it useful, please let the community know via the Discussion forum on the PyUCIS GitHub page.

You can find more details on the YAML Coverage Data Format reference documentation page. 

Merging Coverage Data

One consistently-requested feature for PyUCIS is the ability to merge multiple databases into a single unified coverage database. PyUCIS now supports basic merge functionality. Currently, PyUCIS performs a union merge where all unique coverage features found in all the input databases are propagated to the output database. I anticipate that more merge algorithms will need to be added over time, but hopefully this is a good start.


Let’s take a look at a very simple case. Let’s say we have two coverage-data sets shown below:


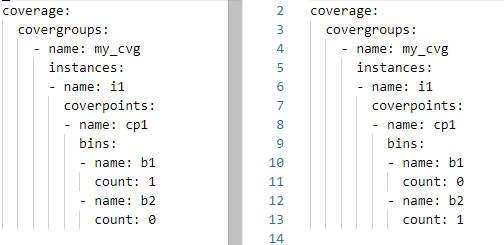
The structure of these two coverage databases is the same (same covergroup type, instance, and coverpoint). Each coverage database has 50% coverage. Let’s merge these two databases and report the coverage.

% ucis merge -if yaml -o merge.xml coverage_1.ycdb coverage_2.ycdb

We specify the two input databases, as well as their format (yaml). We specify the output database as merge.xml.

The resulting coverage report on the merged database will report 100% coverage, as expected:

% ucis report merge.xml

TYPE i1 : 100.000000%

    CVP cp1 : 100.000000%

Reporting Coverage Data

Reporting is a key activity when working with coverage data. We’ve looked at the ability to browse coverage data graphically using the PyUCIS-Viewer, but getting a textual report is every bit as important. In addition to presenting information concisely, textual reports can be processed programmatically to extract key pieces of data. 

We can list the currently-available report plugins using the ucis command:

% ucis list-rpt-formats

json - Produces a machine-readable JSON coverage report

txt  - Produces a human-readable textual coverage report


The default report is textual. Let’s create a textual report on the YAML coverage-data above:

% ucis report -if yaml coverage.ycdb 


Note that we need to specify the format of the input data (yaml). The result is a simple human-readable report of the coverage data in the database.

What if we wanted to post-process the data using a script? We certainly could extract what we need by parsing the output above, but working with data in a machine-readable format is often much simpler. Let’s report our data in JSON format:

% ucis report -if yaml -of json coverage.ycdb 

Obviously, the data is less compact and more verbose. But, reading this into a Python script for further post-processing is incredibly simple! If you’re interested in the JSON report format, have a look at the schema documentation <https://pyucis.readthedocs.io/en/latest/reference/coverage_report_json.html>.

So, for now, PyUCIS supports two textual report formats, and would benefit from more report formats. For example, a plain HTML report and a fancy interactive web-based report. If someone in the community has the skills and is interested, the project would definitely be interested!

Next Steps

PyUCIS continues to evolve, adding a more more hopefully-useful features at a time. Stay tuned for a future post on the plug-in interface, and the addition of more coverage-database and report formats. 


Copyright 2022 Matthew Ballance

The views and opinions expressed above are solely those of the author and do not represent those of my employer or any other party.

Tuesday, December 12, 2017

Make Your Prototype Board Cloud-Accessible


FPGA prototype boards are an important component of the hardware development process, and the progress of synthesizing a design, uploading it to the prototype, and validating its behavior has definitely become easier over time. Modern development environments from the major FPGA vendors make it easy to upload FPGA bitstreams to the board via a JTAG connection or via a USB JTAG adapter (often directly on the prototype board). Standard prototype boards also provide standard interface connectors that enable interaction with the hardware being validated.

So, what's the problem?
Despite how easy it is to connect to modern FPGA prototype boards, it is necessary to be close to and connected to them. Working on an FPGA prototype from the local coffee shop really just isn't a good option.

FPGAMgr
The goal of the FPGAMgr project (https://github.com/mballance/fpgamgr) is to change this. FPGAMgr enables access to an FPGA prototype board via the network -- be that the local network or the internet.

FPGAMgr was developed using the CycloneV-based SocKit prototype board (https://rocketboards.org/foswiki/Documentation/ArrowSoCKitEvaluationBoard), but I'm not aware of any obstacle to making it work with a different vendor's FPGA or different prototype board. FPGAMgr currently provides two key services for interacting with a FPGA prototype board:

  • Programming the FPGA
  • Sending data to and receiving data from I/O interfaces on the FPGA. 


FPGAMgr Components
There are three components to FPGAMgr: The client, the server, and the board configuration.


The client is an API that provides functions for uploading a bitstream to the FPGA, as well as methods to exchange data with I/O interfaces on the FPGA. The server is device and environment agnostic code that processes messages. The board config consists of device- and environment-aware code that knows how to program the FPGA device and knows which I/O interfaces are available to FPGAMgr and how to interact with those interfaces.

FPGAMgr with SocKit
The CycloneV device was Altera's (now Intel's) first foray into pairing an ARM processor with an FPGA fabric. The Arrow SoCKit board (show below) provides an array of physical I/O interfaces connected to the CycloneV.
Since I'm not doing anything too involved with the ARM processor subsystem within the CycloneV, I'll actually run FPGAMgr on the ARM processor. FPGAMgr could also be run on a host workstation connected to the prototype board via JTAG cable and other cables for I/O.

Example
I developed a very simple example design to use in testing out FPGAMgr. Much less involved that what I plan to test using FPGAMgr, but hopefully it illustrates the concept. I wanted to show that I could both program the device, and prove that I'd done so, over the network from my laptop. One of the simplest ways to do so is with a UART-based design that echos back the data it receives. The design looks a bit like this:


The UART is a basic UART from the OpenCores site with a Wishbone bus. The Responder is a custom state machine that initializes the UART, waits for a character to be received, then transmits it back. The count register keeps track of the number of characters received.

The test code that runs on the remote machine is shown (minus some argument-parsing code) below.


The code:
  • Connects via the network to the FPGAMgr server
  • Registers a sideband-channel interface for communicating with the UART
  • Programs the FPGA with the simple design
  • Sends and receives a series of messages from the UART within the design

Demo
The short video below shows the process of connecting to, programming, and interacting with the prototype board from the host workstation.

  • The pane in the upper-left shows the prototype board via a camera pointed at the board.
  • The pane in the lower-left is a login session running on the ARM processor on the SoCKit board.
  • The right-hand pane shows the testbench C++ program running on my laptop.


The general demo process is as follows:

  • I launch the FPGAMgr server specific to the Altera SoCKit in the lower left-hand pane
  • I run the testbench program on my laptop that:
    • Uploads the design image to the FPGA
    • Connects to the UART I/O
    • Sends a series of messages to the UART and receives them back
  • You'll see the LEDs flashing on the prototype as the testbench program runs. The count displayed by the LEDs increments once for 16 characters received by the UART.


Conclusion
FPGAMgr makes it easy to access a prototype board across the network, enabling programming the FPGA and virtualized access to design I/O interfaces. What's present at the moment is proof of concept support for Altera/Intel devices and simple I/O interfaces. 
Do you virtualize access to your FPGA prototype? What are your approaches and key requirements?

Monday, August 28, 2017

Chisel Sharpening: In the end, it's all about results

At the end of the day, it's all about results, of course. A productivity improvement is great, as long as the implementation results at least stay constant. Any decrease in implementation results definitely detract from any productivity improvements.

So, after all the work thus far describing and verifying the wishbone interconnect, we still have to answer the question: how are the results? How does the Chisel description compare, in terms of synthesis results, to the results from the hand-coded description?

In this post, I'll be using Intel/Altera Quartus for synthesis (since I have access to an Altera prototype board and Quartus). If anyone wishes to donate a Zynq prototype board, I'd be happy to report the results from Xilinx Vivado as well.

There are two things that we care about when it comes to implementation: speed and size. What's the maximum frequency at which the implementation operates? How many logic elements are required? How many registers?

Prerequisites

Synthesis tools are very good, by design, at eliminating unused logic. Any I/Os in our design that aren't connected will be optimized out of the design. Consequently, synthesizing the interconnect will only work under two conditions: if all the interconnect I/Os are connected to FPGA device I/Os, or if we build a design around the interconnect that utilizes the all the interconnect I/Os. 
Given the number of I/Os the wishbone interconnect has, the second path is the most feasible.

We already have a synthesizable Wishbone target memory device from the verification environment. Now, we just need something to drive the master interfaces. Just to further explore Chisel, I created a Wishbone initiator using the LFSR Chisel module to randomize the address (to select the target device), read/write, and write data. 


I connected up the LEDs to counters that toggle the LED every time the respective target device is accessed 16,384 times -- just for kicks, and because I like blinking lights...

Results

For comparison, I'll leave everything the same about the design except for the interconnect. Here are the relevant details:

Design Registers ALMs Fmax
Hand-coded 264 239 160.64
Chisel 227 275 201.37
So, Chisel uses:
  • 14% more ALMs than the hand-coded RTL
  • 14% fewer registers than the hand-coded RTL
So, it's a bit of a wash in terms of size.

The performance difference is fairly significant, though: the Chisel design is 25% faster than the hand-coded RTL. So, the (slightly) higher-level description certainly doesn't hurt the results! Now, I'm sure I could achieve the same results with the hand-coded description that the Chisel description achieved. I'm still a bit surprised, though, that the Chisel description achieved better results out the box with a less-than-expert user. So, definitely a promising conclusion to my initial Chisel exploration!


Now, just for fun, here is the design running on the Cylone V prototype board.


Stay tuned for more details on what I'm learning about Chisel constructs. And, you can find the code used in my experiments here: https://github.com/mballance/wb_sys_ip